In this tutorial I will show you how to flash a LED light with Raspberry Pi and Java. This will be a complete step by step tutorial starting with connecting the cables, trough GPIO explanation and finally writing the java code. At the end of this tutorial I will show you how to write a complete java program using the LED light connected to the Raspberry.
Introduction
One of the simplest electrical circuits that you can build is a battery connected to a light source and a switch (the resistor is there to protect the LED):
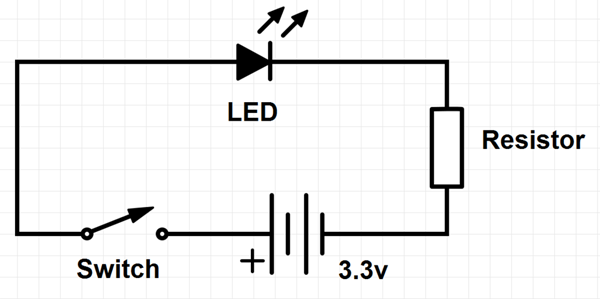
The Raspberry Pi replaces both the switch and the battery in the above diagram.
Requirements
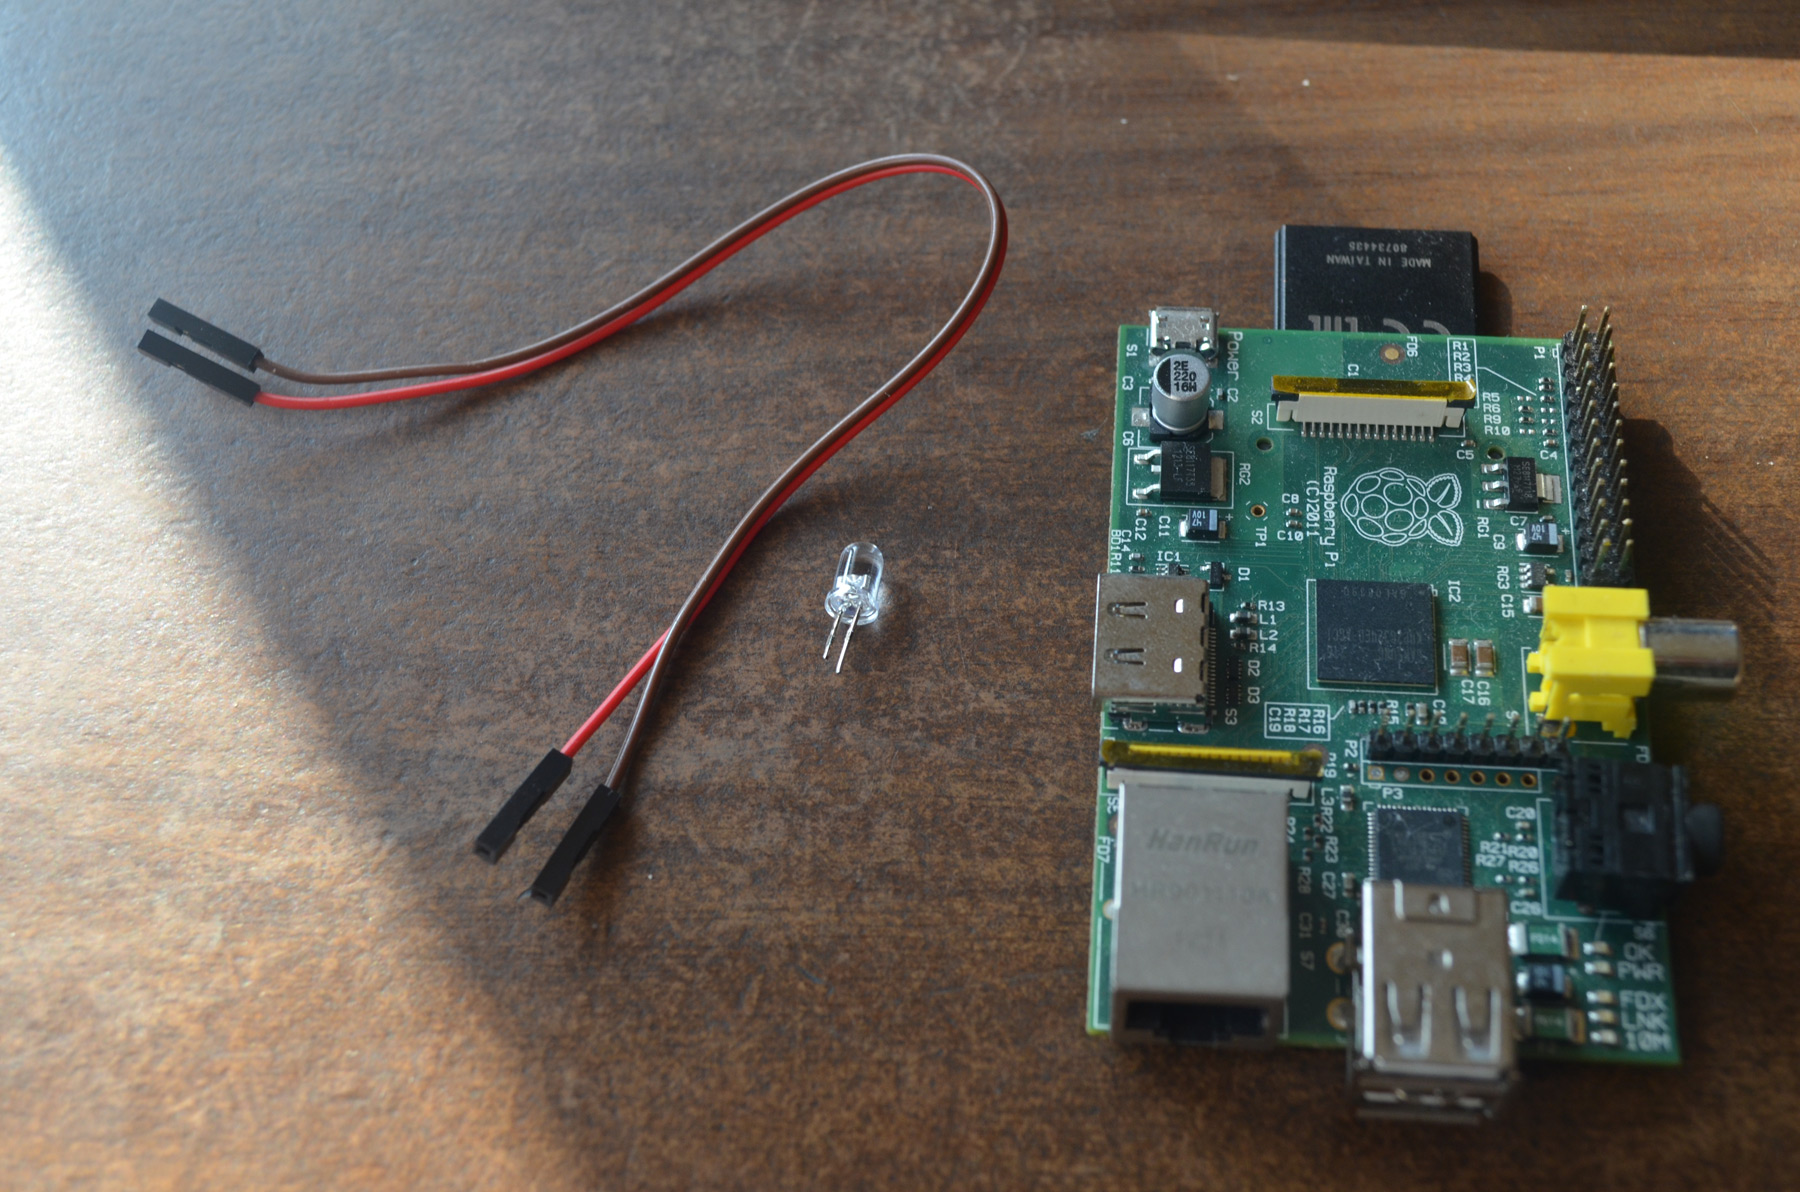
Raspberry Pi board with Raspbian OS (learn how to install and configure Raspbian)
1 x LED light
2 x female to female jumper cable wires (you can buy 40 pcs of them online for less than 2$)
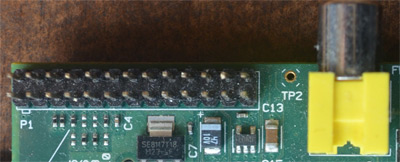
Raspberry Pi GPIO
According to the model the Raspberry Pi provides a different numbers of GPIO (general purpose input/output) pins along the edge of the board, next to the yellow video out socket.
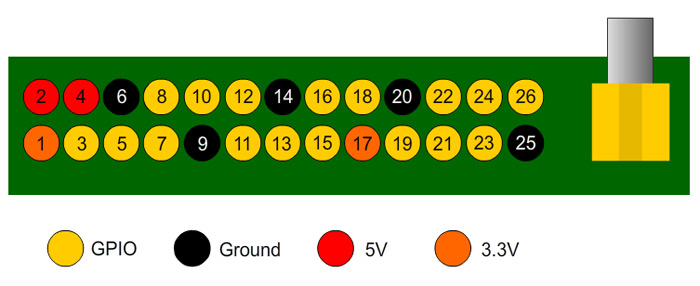
These pins are a physical interface between the Pi and the outside world. Each pin can turn on or off,or go HIGH or LOW in computing terms. When the pin is HIGH it outputs 3.3 volts (3v3); when the pin is LOW it is off. 17 of the 26 pins (for model A and B) are GPIO pins; the others are power or ground pins. Model A+ and B+ have 40 pins and 26 of them are GPIO pins. This tutorial will work for all Raspberry Pi models.
Assembling
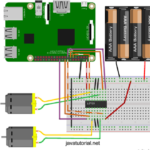
Look at the diagram below. We will connect the LED cathode (-) to Raspberry Pi pin #6 and the anode (+) to pin #12 using the jumper wires
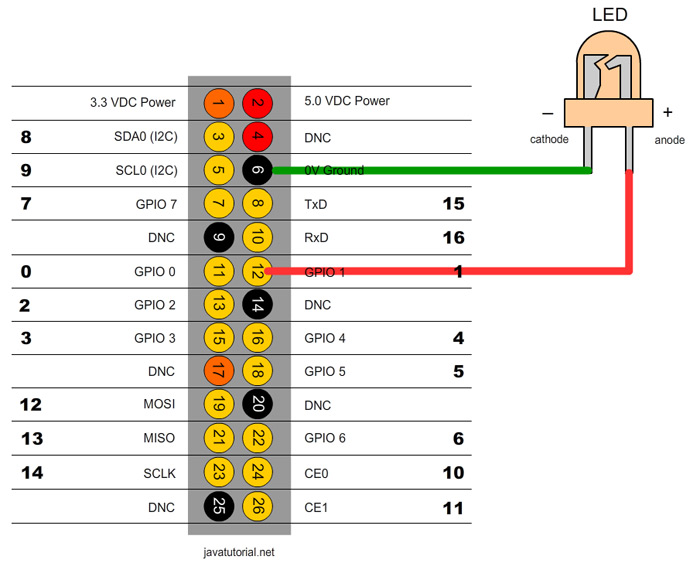
First connect the cables to the LED. I connected a red cable to the anode and a brown one to the cathode. You may use whatever colors you like.

Now connect the other end of the cables to your Raspberry board pins 6 and 12

The assembly is done. Now power on the Pi.
Install Pi4J on Raspberry Pi
For this tutorial we will use Pi4J. Pi4J is a open source Java API which does the low-level communication with the device and gives us an abstract and object oriented approach to control the GPIOs of the Pi using the Java programming language.
The easiest way to install it is to run following command on your Pi. This will download all the dependencies and files you need and put them in /opt/pi4j/lib folder. You can explore other installation option here if this method does not work for you.
curl -s get.pi4j.com | sudo bash
Pi4J gives names and numbers to GPIO pins as shown below:

Writing the Code
First include the Pi4J libs into your project. If you use Maven you can add this dependency to your POM file:
<dependency>
	<groupId>com.pi4j</groupId>
	<artifactId>pi4j-core</artifactId>
	<version>${project.version}</version>
</dependency>
You can also do this the old-fashioned way:
1) Download pi4j ZIP file from the download page
2) Copy and include following JAR files (found in the lib folder in the archive you downloaded) to your project:
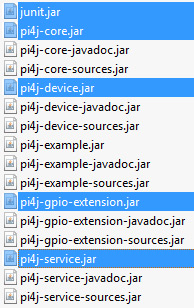
The JAR files are needed for the code to compile.
Now, that we have all the dependencies, lets write the code. Our program will do following:
1) turn on the LED for 2 seconds
2) turn off the LED and wait 1 second
3) turn on the LED for 1 second
import com.pi4j.io.gpio.GpioController;
import com.pi4j.io.gpio.GpioFactory;
import com.pi4j.io.gpio.GpioPinDigitalOutput;
import com.pi4j.io.gpio.PinState;
import com.pi4j.io.gpio.RaspiPin;

public class LedControl {

    public static void main(String[] args) throws InterruptedException {

        // get a handle to the GPIO controller
    	final GpioController gpio = GpioFactory.getInstance();

        // creating the pin with parameter PinState.HIGH
        // will instantly power up the pin
        final GpioPinDigitalOutput pin = gpio.provisionDigitalOutputPin(RaspiPin.GPIO_01, "PinLED", PinState.HIGH);
        System.out.println("light is: ON");

        // wait 2 seconds
        Thread.sleep(2000);

        // turn off GPIO 1
        pin.low();
        System.out.println("light is: OFF");

        // wait 1 second
        Thread.sleep(1000);

        // turn on GPIO 1 for 1 second and then off
        System.out.println("light is: ON for 1 second");
        pin.pulse(1000, true);

        // release the GPIO controller resources
        gpio.shutdown();
    }
}
Execute the program on Raspberry like this
sudo java -classpath .:classes:/opt/pi4j/lib/'*' LedControl
You should now see the LED go on first for 2 seconds and than for 1 second.
Excellent introductory tutorial! Two hint for users …
1. Technically speaking you only need to reference the pi4j-core JAR lib to accomplish simple GPIO control. Nothing wrong with including them all however.
2. You can also use the pin.blink() method to have Pi4J create a background thread that turns the LED on and off at a provided interval. Sample code here: https://github.com/Pi4J/pi4j/blob/develop/pi4j-example/src/main/java/BlinkGpioExample.java
Thanks, Robert (aka Pi4J)
fillip,
you show a resistor in your circuit diagram, but you don’t mention it’s resistance value and you
don’t illustrate it in the circuit. It would need to be in series between the led and either pin
6 or 12, correct ?
Thanks for your tutorial.
Hi, it is always a good idea to protect your LED with a resistor. Pick a 220 Ohm resistor and put it between pin 12 and the LED’s anode. Pin 6 is ground
Raspberry Pi Java Tutorial https://javatutorial.net/raspberry-pi-java-tutorial http://get.pi4j.com/download/pi4j-1.1.deb pi4j project page http://pi4j.com/usage.html pi4j numbering scheme rpi 3 http://pi4j.com/pins/model-3b-rev1.html install java raspberry pi https://www.raspberrypi.org/blog/oracle-java-on-raspberry-pi/ 20171201 Note: GOT IT TO WORK!!!!! $ sudo apt-get update curl -s get.pi4j.com | sudo bash $ sudo apt-get install oracle-java8-jdk $ sudo update-alternatives –config java $ sudo apt-get install maven $ mkdir ~/ $ mkdir -p ~//src/main/java $ mkdir -p ~//src/resources $ mkdir -p ~//test/java $ mkdir -p ~//test/resources cd / nano pom.xml paste Code https://www.raspberrypi.org/blog/oracle-java-on-raspberry-pi/ CTRL+x ‘y’ to save >ls pom.xml >mkdir -p src/main/java/org/calpilot >nano src/main/java/org/calpilot/Pi4jTest.java paste code https://www.raspberrypi.org/blog/oracle-java-on-raspberry-pi/ $ mvn compile package $ sudo java -jar… Read more »