In this tutorial I will show you how to control the direction and speed of DC motors with Raspberry Pi and Java.
I have received several requests to create a tutorial about controlling motor speed and direction with Raspberry Pi and Java, so here we go! In this tutorial I will show you how to control the direction and speed of two motors simultaneously with the usage of the L293D chip.
Hardware Requirements
You will need this components to follow trough the tutorial:
- Raspberry Pi with latest Raspbian installed (learn how to install and configure Raspbian)
- A breadboard to attach all components
- One L293D chip
- 1 or 2 DC motors (the second one is optional) rated for 4.5V to 36V
- Battery pack supplying the right voltage for your motor(s)
- Couple of cables to connect everything
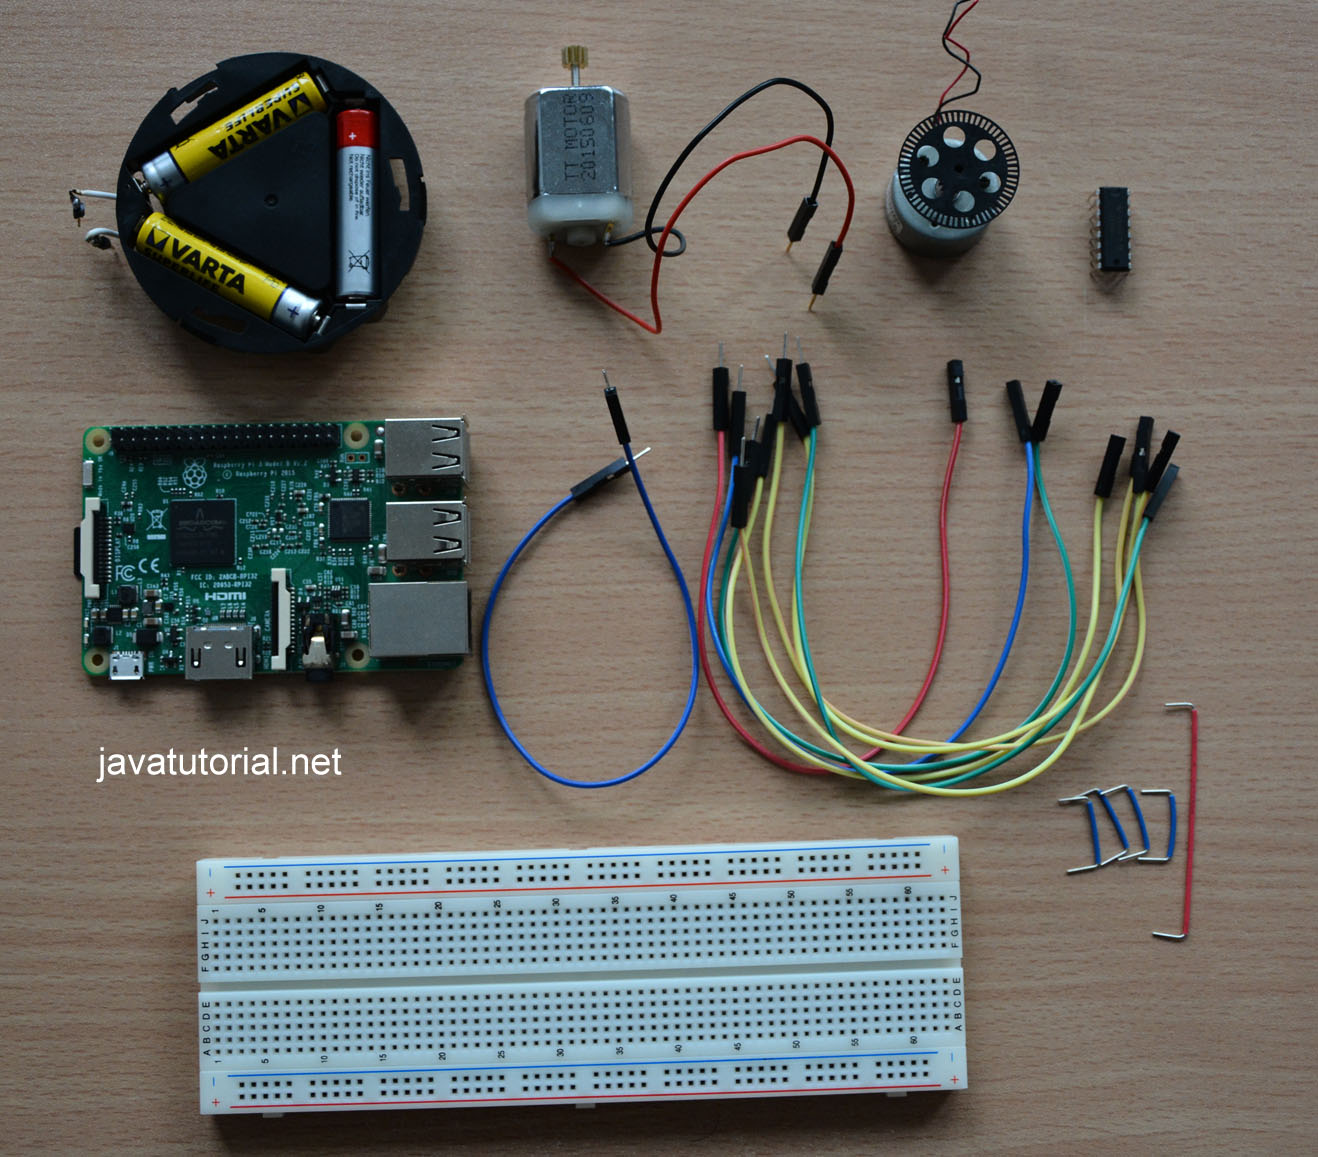
Hardware components
L293D
The L293D is a dual H-Bridge motor driver for DC or stepper motors, which means you can drive two DC motors bidirectionally, or one stepper motor. A good thing about L293D is, that it comes with build in kick-back protection which prevents your Raspberry Pi from damage.
Never connect a motor directly to your Raspberry Pi. This may cause severe damage to your Pi!
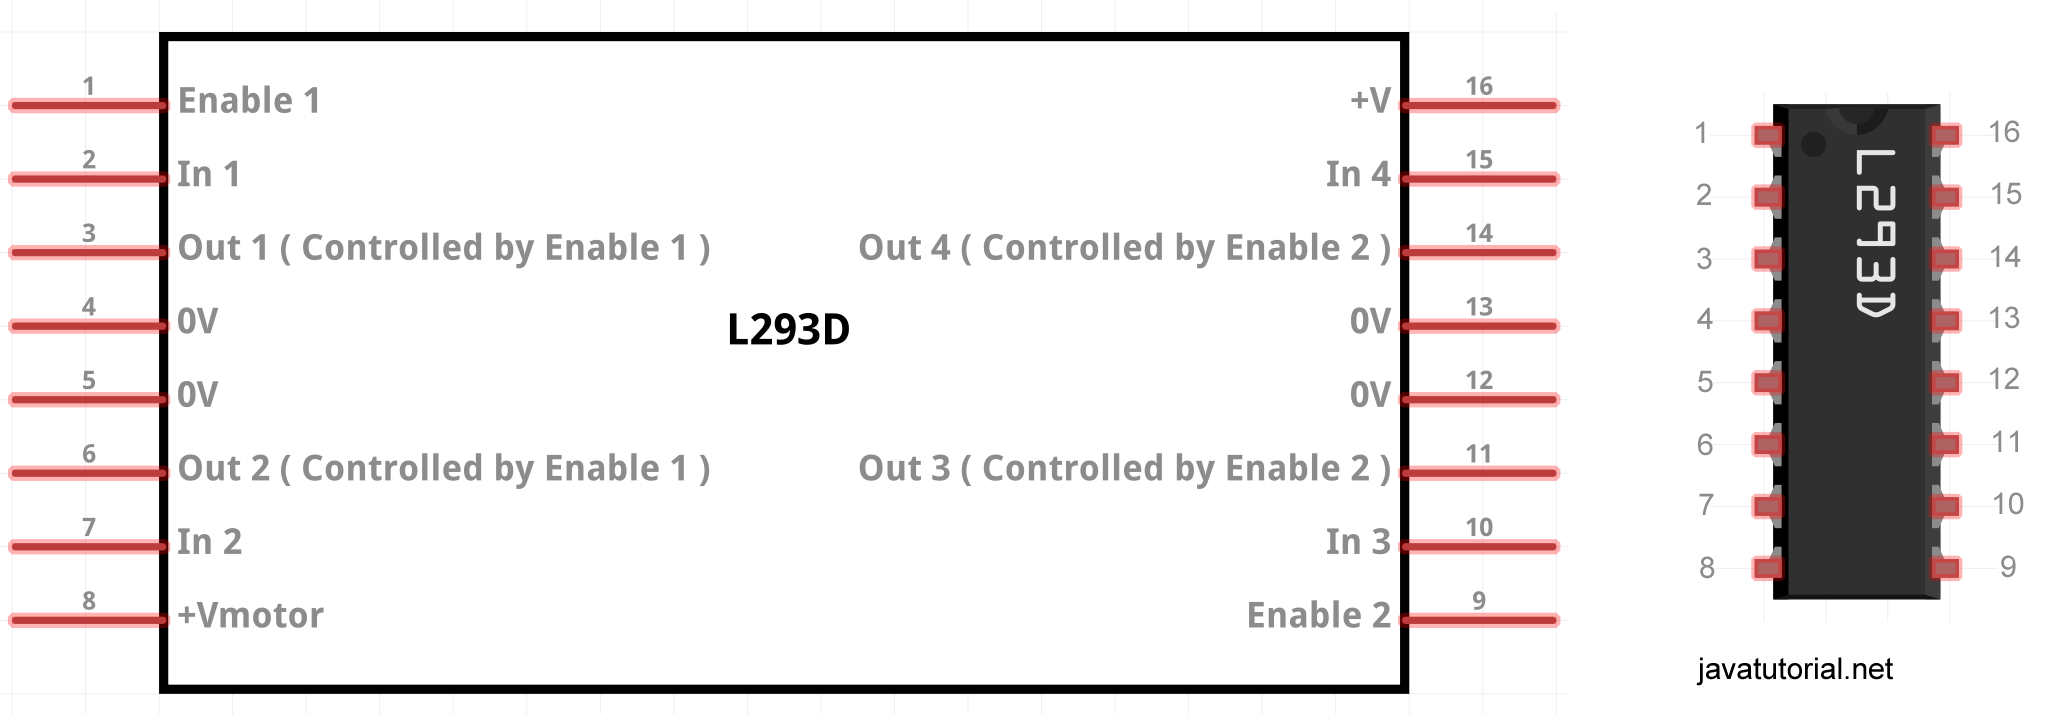
L293D Datasheet
The chip has two +V pins. Pin number 8 (+Vmotor) provides the power for the motors and pin 16 provides power for the chip itself. We will connect pin 8 to a battery pack and pin 16 to Raspberry’s 5V pin.
Choose the Right DC Motor
You need to pick a DC motor from 4.5V to 36V. The L293D does non work well for 3V motors and also has a limitation of 600mA per channel.
Software Requirements
I use Pi4J for all my tutorials. Pi4J is a great library, which allows you to control the Pi’s GPIO pins using the Java programming language. You can find detailed instructions on how to install and configure Pi4J on your Raspberry and your IDE in my introductory Raspberry Pi Java Tutorial.
Assembling the Circuit
While assembling the circuit always disconnect the power supply from your Raspberry Pi! Otherwise you risk to damage the Pi or the components. Always double-check your wiring before you plug in the Pi!
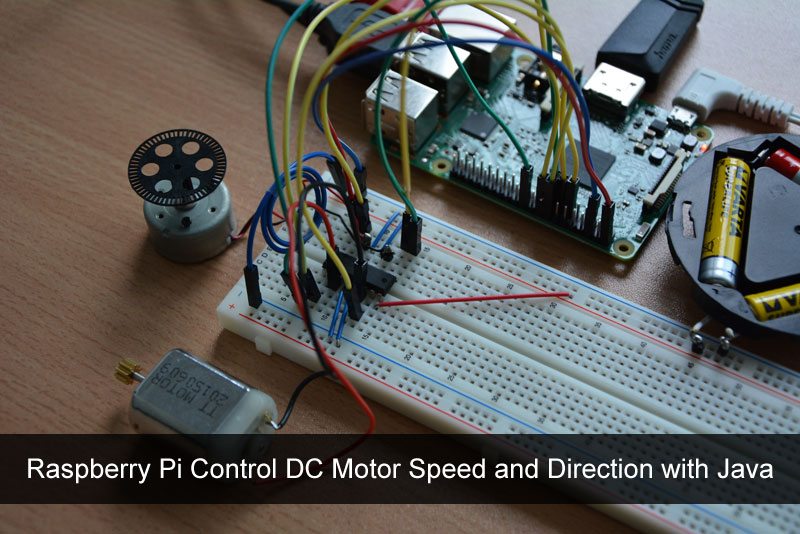
Use the picture below to assemble the circuit.

Hardware setup for Raspberry Pi 3 to control one DC motor with L293D and Java in both directions
In this tutorial I will use the physical numbering of GPIO pins. Physical numbering refers to the pins by simply counting across and down from pin 1 at the top left.
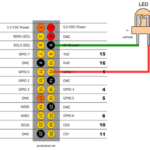
Look at the diagram below it shows the physical pin numbering and the Pi4J mapping. For example physical pin number 12 is named pin #1 in Pi4J. Have this in mind when you write your Java program later in this tutorial. You can find more details on pin numbering in the official Pi4J site
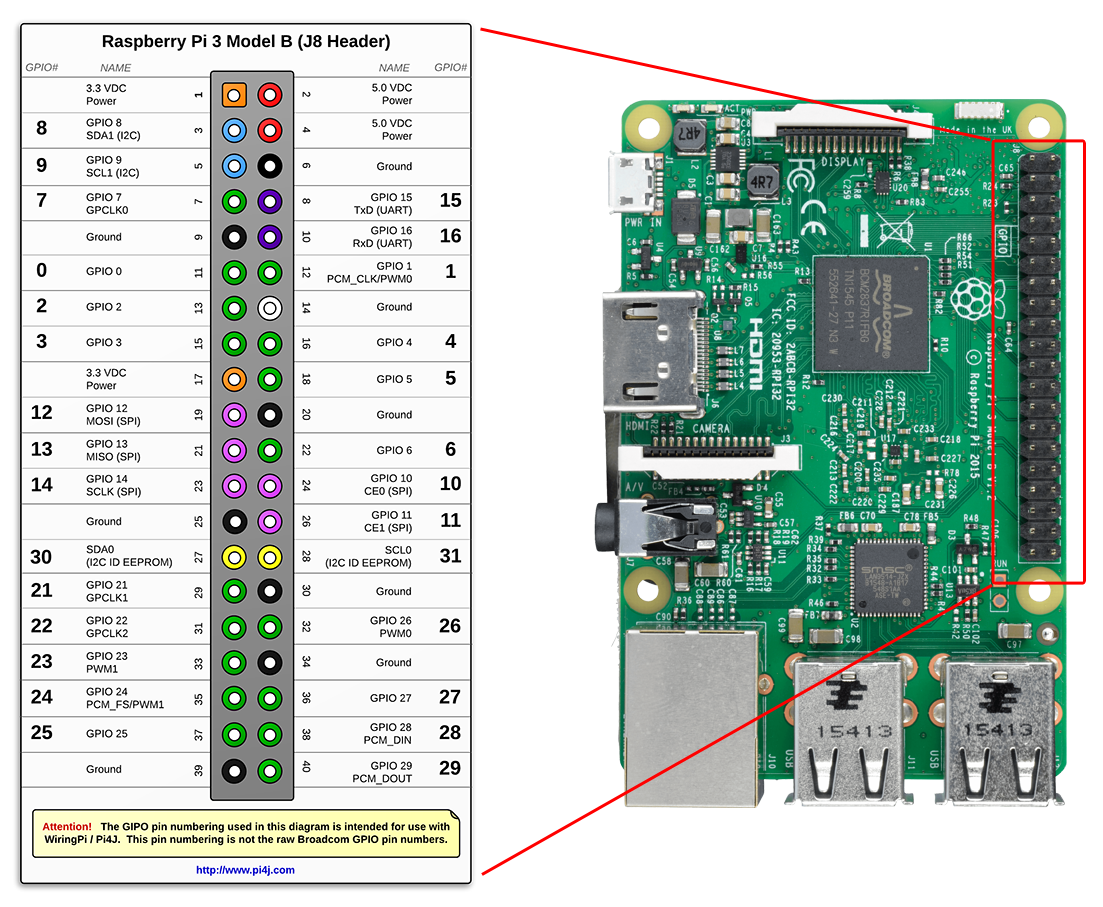
Raspberry Pi 3 Model B Pins and Pi4J mapping
Note: this tutorial is made for Raspberry Pi 3 model B, of course you can build the same circuit and use the same Java code with Raspberry Pi 1 or 2 – just watch for the pin numbering.
- Connect L293D pin #16 to Pi physical pin #2 (5.0 VDC Power)
- Connect L293D pin #4, pin #5, pin #12 and pin #13 to Pi physical pin #6 (Ground)
- Connect L293D pin #8 to the battery pack
- Connect L293D pin #3 and pin #6 to the motor
- Connect L293D pin #1 to Pi physical pin #22
- Connect L293D pin #2 to Pi physical pin #18
- Connect L293D pin #7 to Pi physical pin #16
I will also post the circuit schematic here for reference
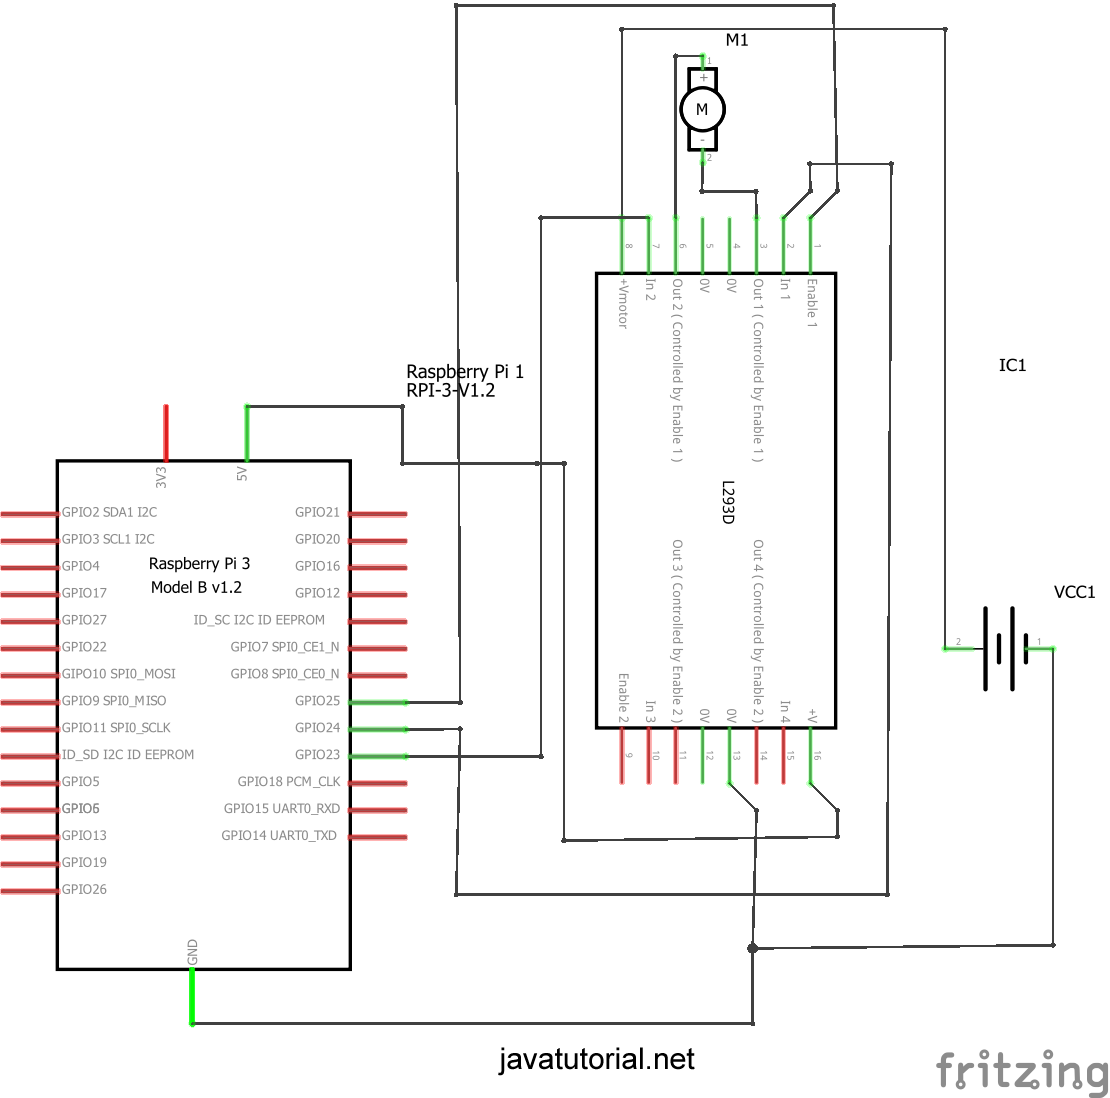
Raspberry Pi and L293D one motor schematic
Photo of the assembled circuit with 1 motor
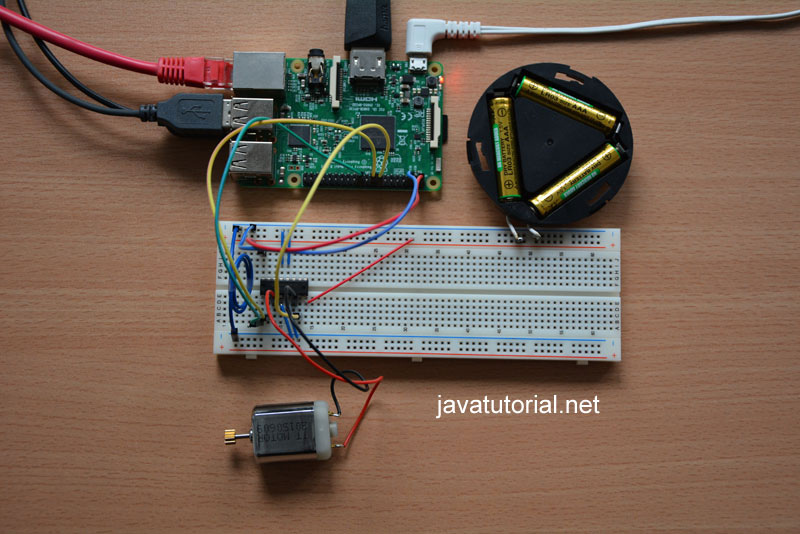
Picture of the 1 motor setup
Java Program to Control the Direction of one DC Motor
Here comes the fun part. After you have connected everything you can open your favorite Java IDE and write the code. The code below will spin the motor in one direction 3 seconds and than spin the motor in the oposite direction for 6 seconds.
import com.pi4j.io.gpio.GpioController;
import com.pi4j.io.gpio.GpioFactory;
import com.pi4j.io.gpio.GpioPinDigitalOutput;
import com.pi4j.io.gpio.RaspiPin;

/**
 * Controls motor direction of a single motor
 * @author https://javatutorial.net
 */
public class ControlOneMotorDirection {

	public static void main(String[] args) throws InterruptedException {
		// get a handle to the GPIO controller
		final GpioController gpio = GpioFactory.getInstance();

		final GpioPinDigitalOutput pinA = gpio.provisionDigitalOutputPin(RaspiPin.GPIO_04, "PinA");
		final GpioPinDigitalOutput pinB = gpio.provisionDigitalOutputPin(RaspiPin.GPIO_05, "PinB");
		final GpioPinDigitalOutput pinE = gpio.provisionDigitalOutputPin(RaspiPin.GPIO_06, "PinE");

		System.out.println("rotate motor clockwise for 3 seconds");
		pinA.high();
		pinB.low();
		pinE.high();

		// wait 3 seconds
		Thread.sleep(3000);

		System.out.println("rotate motor in oposite derection for 6 seconds");
		pinA.low();
		pinB.high();

		// wait 6 seconds
		Thread.sleep(6000);

		// stop motor
		System.out.println("Stopping motor");
		pinE.low();

		gpio.shutdown();
	}
}
First we map digital output pinA to GPIO pin #4, pinB to GPIO pin #5 and pinE to GPIO pin #6. If you wonder, why we use pins 4, 5 and 6 in the code, please look again at the Pi4J mapping diagram I posted above. The name pinE comes from “pin enable”.
If pinE is high, than the motor is on. Putting pinE to low will turn off the motor. We determine the rotation direction by switching one of the pins A or B to high and the other one to low. For example if we set pinA to high and pinB to low the motor will turn clockwise. Swap the pins and the motor will rotate in the opposite direction.
Execute the program on Raspberry with following command
sudo java -classpath .:classes:/opt/pi4j/lib/'*' ControlOneMotorDirection
Following video demonstrates the result
Adding a Second Motor (optional)
With L293D we can control the direction of 2 motors independantly, so why we don’t try this? Adding a second motor to the circuit is easy – just plug the second motor into the breadboard and connect the additional 3 pins of the L293D chip to your Raspberry Pi with 3 additional cables.

Raspberry Pi control 2 motors
This is a picture of the assembled circuit – the 2 motors setup
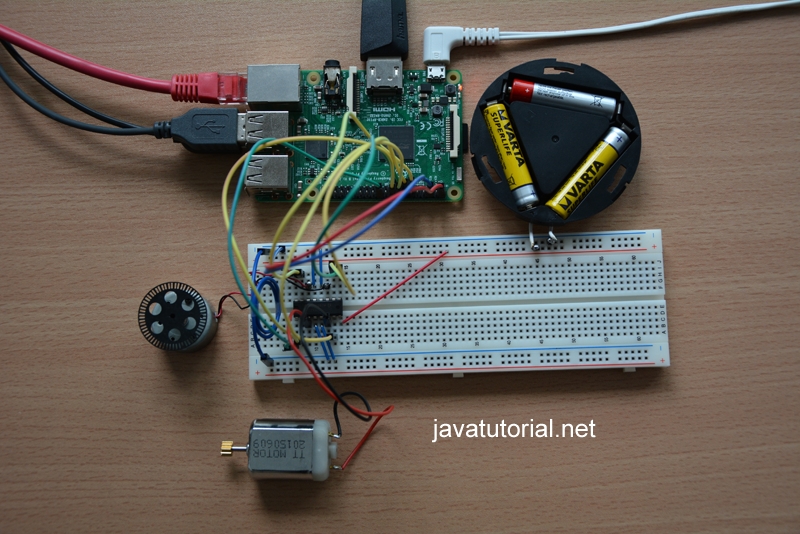
Raspberry Pi circuit with L293D and two DC motors
Java Program to Control the Direction of two DC Motors
We will call our firs motor motor1 and the second motor motor2. We assign 3 additional Raspberry Pi GPIO pins, namely 0, 2 and 3.
The Java program below will rotate both motors in one direction for 3 seconds, than rotate firs motor in opposite direction for 3 seconds and the second motor for 6 seconds.
import com.pi4j.io.gpio.GpioController;
import com.pi4j.io.gpio.GpioFactory;
import com.pi4j.io.gpio.GpioPinDigitalOutput;
import com.pi4j.io.gpio.RaspiPin;

/**
 * Controls motor direction of a two DC motors
 * @author https://javatutorial.net
 */
public class ControlTwoMotorsDirection {

	public static void main(String[] args) throws InterruptedException {
		// get a handle to the GPIO controller
		final GpioController gpio = GpioFactory.getInstance();

		final GpioPinDigitalOutput motor1pinA = gpio.provisionDigitalOutputPin(RaspiPin.GPIO_04, "m1A");
		final GpioPinDigitalOutput motor1pinB = gpio.provisionDigitalOutputPin(RaspiPin.GPIO_05, "m1B");
		final GpioPinDigitalOutput motor1pinE = gpio.provisionDigitalOutputPin(RaspiPin.GPIO_06, "m1E");
		final GpioPinDigitalOutput motor2pinA = gpio.provisionDigitalOutputPin(RaspiPin.GPIO_00, "m2A");
		final GpioPinDigitalOutput motor2pinB = gpio.provisionDigitalOutputPin(RaspiPin.GPIO_02, "m2B");
		final GpioPinDigitalOutput motor2pinE = gpio.provisionDigitalOutputPin(RaspiPin.GPIO_03, "m2E");

		System.out.println("rotate both motors clockwise for 3 seconds");
		motor1pinA.high();
		motor1pinB.low();
		motor1pinE.high();
		motor2pinA.high();
		motor2pinB.low();
		motor2pinE.high();

		// wait 3 seconds
		Thread.sleep(3000);

		System.out.println("rotate motor 1 in oposite derection for 3 seconds "
				+ "and motor 2 in oposite direction for 6 seconds");
		motor1pinA.low();
		motor1pinB.high();
		motor2pinA.low();
		motor2pinB.high();

		// wait 3 seconds
		Thread.sleep(3000);
		System.out.println("Stopping motor 1");
		motor1pinE.low();

		// wait 3 seconds
		Thread.sleep(3000);
		System.out.println("Stopping motor 2");
		motor2pinE.low();

		gpio.shutdown();
	}
}
We use the same rule here: if pinE (enable) is high, than the motor is on. Putting pinE to low will turn off the motor. We determine the rotation direction by switching one of the pins A or B to high and the other one to low.
Execute the program on Raspberry with following command
sudo java -classpath .:classes:/opt/pi4j/lib/'*' ControlTwoMotorsDirection
Following video demonstrates the result
Java Program to Control the Speed and Direction of two DC Motors
And finally I will show you how to control the speed and direction of two DC motors. We will use the same circuit we build for our 2 motors setup. Also we will rely programatically on Soft PWM to control the speed of the motors. You can read more about PWM in my tutorial Raspberry Pi Dim LED with PWM and Java
Look at the following java code. Note, that pins A and B for motors 1 and 2 are set as Soft PWM pins. For the enable pins (motor1pinE and motor2pinE) we use exactly the same definition as in the previous code.
Once executed the program will:
- rotate motor 1 clockwise at 15% speed for 2 seconds
- rotate motor 1 clockwise at 60% speed for 2 seconds
- rotate motor 1 clockwise at full speed for 2 seconds
- rotate motor 1 in opposite direction at 50% speed for 3 seconds
- stop motor 1
- rotate motor 2 clockwise at 30% speed for 2 seconds
- rotate motor 2 in opposite direction at full speed for 3 seconds
- stop motor 2
import com.pi4j.io.gpio.GpioController;
import com.pi4j.io.gpio.GpioFactory;
import com.pi4j.io.gpio.GpioPinDigitalOutput;
import com.pi4j.io.gpio.RaspiPin;
import com.pi4j.wiringpi.SoftPwm;

/**
 * Controls motor speed and direction of two DC motors
 * @author https://javatutorial.net
 */
public class ControlMotorsDirectionAndSpeed {

	private static int MOTOR_1_PIN_A = 4;
	private static int MOTOR_1_PIN_B = 5;
	private static int MOTOR_2_PIN_A = 0;
	private static int MOTOR_2_PIN_B = 2;

	public static void main(String[] args) throws InterruptedException {
		// get a handle to the GPIO controller
		final GpioController gpio = GpioFactory.getInstance();

		// init soft PWM pins
		// softPwmCreate(int pin, int value, int range)
		// the range is set like (min=0 ; max=100)
		SoftPwm.softPwmCreate(MOTOR_1_PIN_A, 0, 100);
		SoftPwm.softPwmCreate(MOTOR_1_PIN_B, 0, 100);
		SoftPwm.softPwmCreate(MOTOR_2_PIN_A, 0, 100);
		SoftPwm.softPwmCreate(MOTOR_2_PIN_B, 0, 100);

		// init GPIO pins
		final GpioPinDigitalOutput motor1pinE = gpio.provisionDigitalOutputPin(RaspiPin.GPIO_06, "m1E");
		final GpioPinDigitalOutput motor2pinE = gpio.provisionDigitalOutputPin(RaspiPin.GPIO_03, "m2E");

		System.out.println("rotate motor 1 clockwise at 15% speed for 2 seconds");
		motor1pinE.high();
		SoftPwm.softPwmWrite(MOTOR_1_PIN_A, 15);

		// wait 2 seconds
		Thread.sleep(2000);

		System.out.println("rotate motor 1 clockwise at 60% speed for 2 seconds");
		SoftPwm.softPwmWrite(MOTOR_1_PIN_A, 60);

		// wait 2 seconds
		Thread.sleep(2000);

		System.out.println("rotate motor 1 clockwise at full speed for 2 seconds");
		SoftPwm.softPwmWrite(MOTOR_1_PIN_A, 100);

		// wait 2 seconds
		Thread.sleep(2000);

		System.out.println("rotate motor 1 in opposite direction at 50% speed for 3 seconds");
		SoftPwm.softPwmWrite(MOTOR_1_PIN_A, 0);
		SoftPwm.softPwmWrite(MOTOR_1_PIN_B, 50);

		// wait 3 seconds
		Thread.sleep(3000);

		// disable motor 1
		SoftPwm.softPwmWrite(MOTOR_1_PIN_B, 0);
		motor1pinE.low();

		System.out.println("rotate motor 2 clockwise at 30% speed for 2 seconds");
		motor2pinE.high();
		SoftPwm.softPwmWrite(MOTOR_2_PIN_A, 30);

		// wait 2 seconds
		Thread.sleep(2000);

		System.out.println("rotate motor 2 in opposite direction at 100% speed for 3 seconds");
		SoftPwm.softPwmWrite(MOTOR_2_PIN_A, 0);
		SoftPwm.softPwmWrite(MOTOR_2_PIN_B, 100);

		// wait 3 seconds
		Thread.sleep(3000);

		// disable motor 2
		SoftPwm.softPwmWrite(MOTOR_2_PIN_B, 0);
		motor2pinE.low();

		gpio.shutdown();
	}
}
Execute the program on Raspberry with following command
sudo java -classpath .:classes:/opt/pi4j/lib/'*' ControlMotorsDirectionAndSpeed
You should see this console output when running the program

Program console output
Following video demonstrates the result
Conclusion
Are you still reading this? Thank you! It was a long tutorial 🙂 Now, after you know how to control motors with your Raspberry Pi maybe you can think of building some cool project or even a small robot and share the results with us 🙂
As always I love to read your comments and answer your questions. If you like this tutorial, or my other tutorial, please spread the word!
You can find all the project files in GitHub: https://github.com/JavaTutorialNetwork/Tutorials/tree/master/RaspberryPiControlMotors
Sources:
Control DC motors with Pi and Python
I have an issue, when ever I enter the command line the console returns an error about being unable to find or load the class file. I am new to pi4j so I have no idea why it’s doing this.
Can you please share the command you are executing and the exact error you see? Also make sure pi4j is properly installed on your raspberry. Follow this tutorial https://javatutorial.net/raspberry-pi-java-tutorial and the paragraph named “Install Pi4J on Raspberry Pi” for more info.
I am using the command line “sudo java -classpath .:classes:/opt/pi4j/lib/’*’ ControlMotorsDirectionAndSpeed” (The one provided). My error reads: “Error:Could not find or load main class ControlMotorsDirectionAndSpeed.”
I’m quite sure thsat my pi4j has been installed correctly. I have also reinstalled it, and it’s file is located within the opt folder.
There are few possible reasons you see this error:
1) The class is not compiled – check if you have a file named ControlMotorsDirectionAndSpeed.class in the directory you execute the command
2) The class file is inside a package – for example com.mypackage , in this case you need to use the full class name including the package name like this com.mypackage.ControlMotorsDirectionAndSpeed
3) you are executing the command in the wrong directory
You may also find this comment useful https://stackoverflow.com/a/18093929/2331741
I am currently using the bluej IDE, is there anything in particular that is different? Also I have tried the changes suggested for the errors but I have found no success.
Thank you very nice expression