This tutorial demonstrates how to install and configure Java 9 Beta on Eclipse Oxygen
This tutorial aims to help developers to test Java 9 features before the official release using the early access Java 9 build. The tutorial has been tested on Eclipse Oxygen 4.7.0 with JDK 9 build 181
1. Install Java 9 Early access build
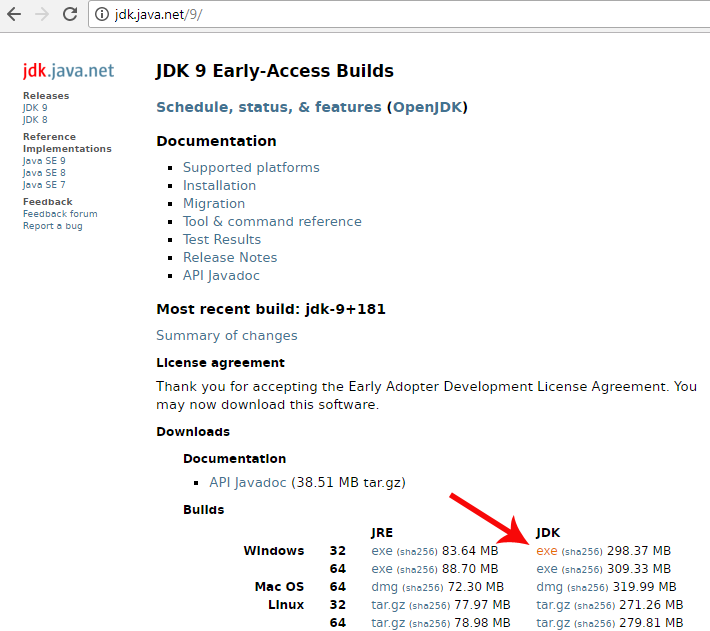
Go to Java 9 download page and download the installer package
Run the executable, follow the steps and install Java 9
2. Install Eclipse Oxygen
Go to Eclipse download page and download “Eclipse IDE for Java Developers” or “Eclipse IDE for Java EE Developers”
Unarchive Eclipse
Note: You will require JDK 8 or previous version pre-installed on your System.
If Java 9 is the only java version you have installed – Eclipse will not start. You will find following error in eclipse log file:
eclipse.buildId=4.7.0.I20170612-0950
java.version=9
java.vendor=Oracle Corporation
BootLoader constants: OS=win32, ARCH=x86_64, WS=win32, NL=en_US
Framework arguments:  -product org.eclipse.epp.package.jee.product
Command-line arguments:  -os win32 -ws win32 -arch x86_64 -product org.eclipse.epp.package.jee.product

!ENTRY org.eclipse.osgi 4 0 2017-09-08 12:17:02.768
!MESSAGE Application error
!STACK 1
org.eclipse.e4.core.di.InjectionException: java.lang.NoClassDefFoundError: javax/annotation/PostConstruct
	at org.eclipse.e4.core.internal.di.InjectorImpl.internalMake(InjectorImpl.java:410)
	at org.eclipse.e4.core.internal.di.InjectorImpl.make(InjectorImpl.java:318)
	at org.eclipse.e4.core.contexts.ContextInjectionFactory.make(ContextInjectionFactory.java:162)
	at org.eclipse.e4.ui.internal.workbench.swt.E4Application.createDefaultHeadlessContext(E4Application.java:491)
	at org.eclipse.e4.ui.internal.workbench.swt.E4Application.createDefaultContext(E4Application.java:505)
	at org.eclipse.e4.ui.internal.workbench.swt.E4Application.createE4Workbench(E4Application.java:204)
	at org.eclipse.ui.internal.Workbench.lambda$3(Workbench.java:614)
	at org.eclipse.core.databinding.observable.Realm.runWithDefault(Realm.java:336)
	at org.eclipse.ui.internal.Workbench.createAndRunWorkbench(Workbench.java:594)
	at org.eclipse.ui.PlatformUI.createAndRunWorkbench(PlatformUI.java:148)
	at org.eclipse.ui.internal.ide.application.IDEApplication.start(IDEApplication.java:151)
	at org.eclipse.equinox.internal.app.EclipseAppHandle.run(EclipseAppHandle.java:196)
	at org.eclipse.core.runtime.internal.adaptor.EclipseAppLauncher.runApplication(EclipseAppLauncher.java:134)
	at org.eclipse.core.runtime.internal.adaptor.EclipseAppLauncher.start(EclipseAppLauncher.java:104)
	at org.eclipse.core.runtime.adaptor.EclipseStarter.run(EclipseStarter.java:388)
	at org.eclipse.core.runtime.adaptor.EclipseStarter.run(EclipseStarter.java:243)
	at java.base/jdk.internal.reflect.NativeMethodAccessorImpl.invoke0(Native Method)
	at java.base/jdk.internal.reflect.NativeMethodAccessorImpl.invoke(Unknown Source)
	at java.base/jdk.internal.reflect.DelegatingMethodAccessorImpl.invoke(Unknown Source)
	at java.base/java.lang.reflect.Method.invoke(Unknown Source)
	at org.eclipse.equinox.launcher.Main.invokeFramework(Main.java:653)
	at org.eclipse.equinox.launcher.Main.basicRun(Main.java:590)
	at org.eclipse.equinox.launcher.Main.run(Main.java:1499)
	at org.eclipse.equinox.launcher.Main.main(Main.java:1472)
Caused by: java.lang.NoClassDefFoundError: javax/annotation/PostConstruct
	at org.eclipse.e4.core.internal.di.InjectorImpl.inject(InjectorImpl.java:124)
	at org.eclipse.e4.core.internal.di.InjectorImpl.internalMake(InjectorImpl.java:399)
	... 23 more
Caused by: java.lang.ClassNotFoundException: javax.annotation.PostConstruct cannot be found by org.eclipse.e4.core.di_1.6.100.v20170421-1418
	at org.eclipse.osgi.internal.loader.BundleLoader.findClassInternal(BundleLoader.java:433)
	at org.eclipse.osgi.internal.loader.BundleLoader.findClass(BundleLoader.java:395)
	at org.eclipse.osgi.internal.loader.BundleLoader.findClass(BundleLoader.java:387)
	at org.eclipse.osgi.internal.loader.ModuleClassLoader.loadClass(ModuleClassLoader.java:150)
	at java.base/java.lang.ClassLoader.loadClass(Unknown Source)
	... 25 more
3. Add Java 9 Support for Eclipse
Got to Eclipse Marketplace and install Java 9 Support for Eclipse Oxygen by dragging the “Install” button to your running Eclipse window
Restart Eclipse when prompted
4. Create a Java 9 Eclipse Project
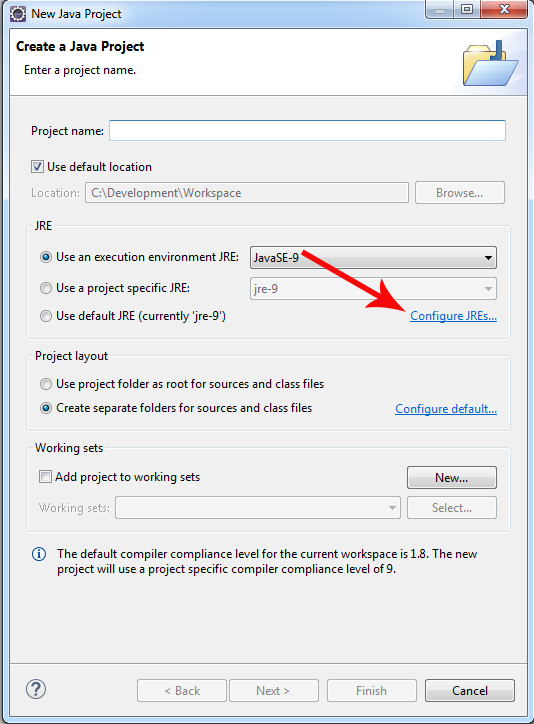
Open Eclipse and go to File -> New -> Java Project
In “New Java Project Window” click on “Configure JREs…”
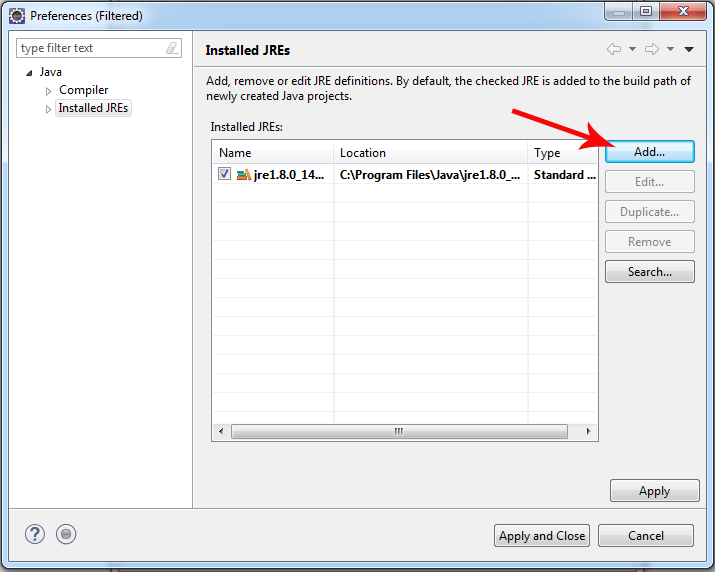
In “Installed JREs” window press the “Add…” button
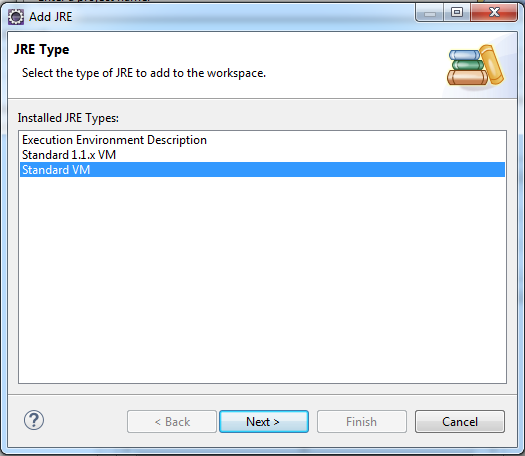
Select “Standard VM” and press “Next >” button
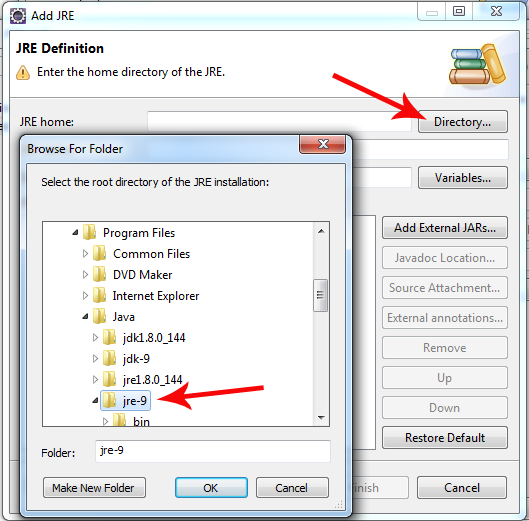
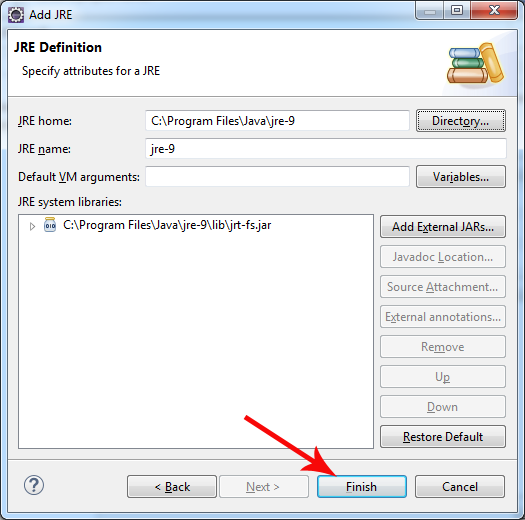
Under “JRE home” press the “Directory…” button, than browse and select your JRE 9 root directory. Note: If you select the JDK directory instead, you will not be able to build your projects
Confirm by pressing the “Finish” button
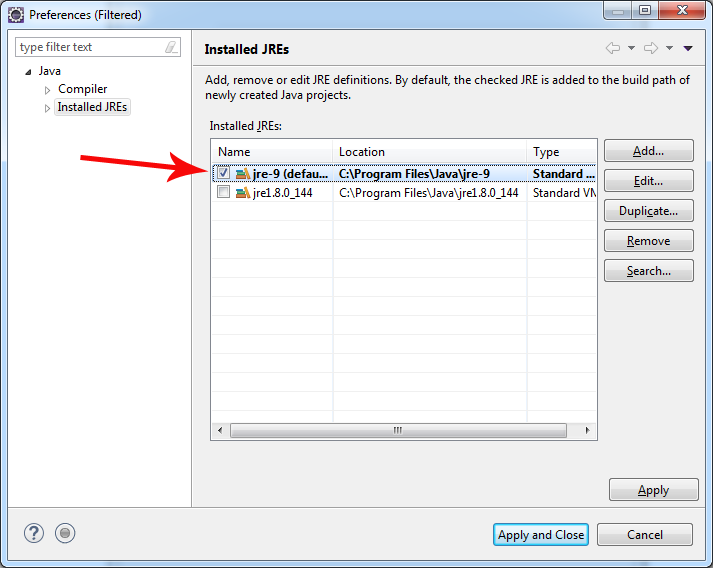
Now select jre-9 in the list and apply the changes
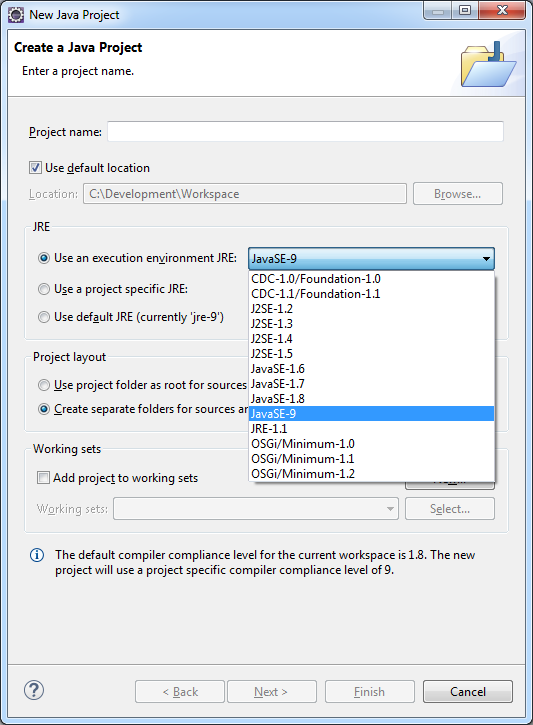
Back in “Create a Java Project” window use the “Use an execution environment JRE” dropdown to select Java 9 for your new project
Now you are ready to try some of the new Java 9 features
Many of the tutorials you will find here are based on the book Mastering Java 9 written by Dr. Edward Lavieri and Peter Verhas. This book will provide you with complete and deep understanding of the new Java 9 concepts and tools.
