Previously, we’ve covered how to access the Raspberry Pi through SSH.
Remote access to the Raspberry Pi removes the need to either have 2 screens or switch between 2 systems. In this post, I’ll teach you how to create a Remote Desktop Connection for the Raspberry Pi via VNC.

Requirements
- Two programs: (1) VNC Server for the computer we’ll need to control, and (2) VNC Viewer on your gadget we’ll be controlling from.
- Raspberry Pi storage device (such as the Micro-SD)
- Raspberry Pi board
- Computer
Luckily, Raspbian has a pre-loaded VNC Connect, the remote access software for RealVNC. VNC Connect has a VNC Viewer and a VNC Server. Now, run this Terminal commands to check if you’ve got an up-to-date VNC Connect version.
sudo apt-get update
sudo qpt-get install realvnc-vnc-server realvnc-vnc-viewer
Step 1: Activate VNC
Just like we did in the SSH guide (first enabling SSH), enable VNC through either (a) GUI or (b) via Terminal. I’ll discuss how to use either of the outlined methods below.
(a) Enable VNC through GUI
On your computer, Go to the Preferences > then Raspberry Pi settings > then click “Interfaces.” While at this, choose “VNC: Enabled.”
(b) Enable VNC using Terminal
On the computer, launch Terminal and type the command below:
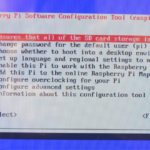
sudo raspi-config
Go to the “Advanced Options” then choose VNC. On the pop up prompt, hit “Yes” and finally exit by selecting “Finish.”
Step 2: Now connect the Raspberry Pi through the VNC Viewer
Again, there exists two methods to access the remote desktop to the Raspberry Pi via VNC Viewer via (i) direct connection and (ii) cloud connection. I’ll briefly discuss both methods.
(i) Direct connection
If you’re using a home network, then it’ll be straightforward to establish a direct connection. Here are the steps to take:
-
- On Raspberry Pi Terminal, run the command below:
hostname -I
The Terminal will show the IP address (private). Save it for later use!
- Now, go to the device we’ll use to command the Raspberry Pi and install the VNC Viewer on it. Download your VNC Viewer here.
- Next, type the IP address (private) to the VNC Viewer (the one you just saved above)
- Finally, VNC Server will require you authenticate using the Raspberry Pi’s credential (username & password). “pi” & “raspberry” if you’ve not changed the Pi’s login credentials.
(ii) Establish the cloud connection
RealVNC will allow you to enrol and use a free account for non-commercial or for educational purposes.
Notably, cloud connection is secure and will not require configuration of the router port forwarding or even knowing the Raspberry Pi’s IP.
However, Cloud connections are not suitable for home network connection and might be slower than a direct connection. Here’s how to create the cloud connection:
- Create a RealVNC here.
- Use the RealVNC account to sign into your VNC Server on the Raspberry Pi.
- Next, a screen will come up, and we’ll need to select “Direct & cloud connectivity” from the “Choose connectivity method” option.
- Now, download your VNC Viewer and install it on the gadget we’ll be using to command the Raspberry Pi.
- Use the RealVNC account to sign into the VNC Viewer. Click on the Raspberry Pi icon.
- Authenticate the Raspberry Pi using your username & password (use default settings if applicable).
If all is correct up to this point, then we’ll see a Raspberry Pi’s desktop on your device.
Step 3: Finally, create the virtual desktop
- On the Raspberry Pi’ Terminal, run the vncserver and record Pi’s IP address and figure displayed on the screen.
- Next, on the gadget, we’ll be using to command the Raspberry Pi, type the IP address and port number into the VNC Viewer.
- Enter the Raspberry Pi authentication: username & password. Remember, the default Raspberry Pi credentials are “pi” and “raspberry” respectively.
- Done!
thanks for sharing.