This tutorial describes different ways to implement Spring MVC Controllers and gives examples.
In my previous tutorial Create Simple Spring Web App with STS I have shown you how to build a Spring Boot App introducing controllers. This tutorial extends on the previous one.
Before we begin with the implementation, let’s make a quick overview of how controllers take part in the MVC workflow.
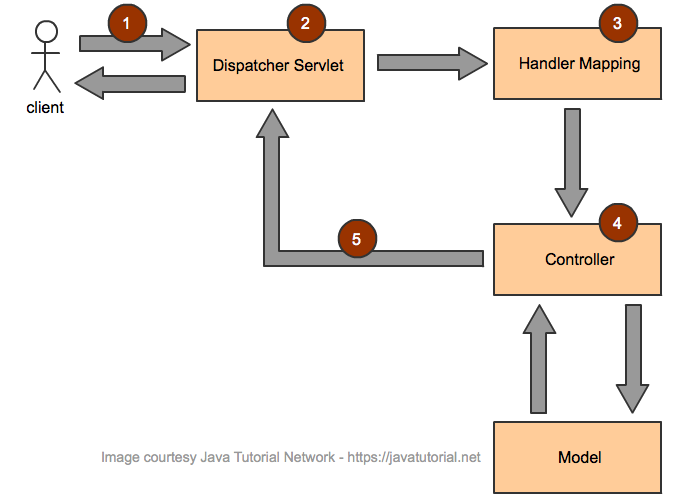
Spring MVC architecture workflow
- Incoming requests from the client are interpreted by the Dispatcher Servlet
- The Dispatcher Servlet does the initial processing by resolving request attributes and making objects available to the handlers
- An appropriate handler is determined and invoked for further processing the request. The appropriate method on the appropriate controller is determined
- The controller processes the request and returns an instance of
ModelAndView - The instance of
ModelAndViewis further processed by the Dispatcher servlet to send out the response to the client
Enable JSP in Spring Boot Applications
If you want to enable JSP following has to be done:
In pom.xml file add following dependencies:
<dependency>
	<groupId>org.apache.tomcat.embed</groupId>
	<artifactId>tomcat-embed-jasper</artifactId>
</dependency>

<dependency>
	<groupId>javax.servlet</groupId>
	<artifactId>jstl</artifactId>
</dependency>
In src/main/resources/application.properties add this two lines
spring.mvc.view.prefix=/WEB-INF/jsp/
spring.mvc.view.suffix=.jsp
Create the folder src/main/resources/META-INF/resources/WEB-INF/jsp/ and put your JSP files in there
Implementing Spring Controller to Return JSP Page
Following example demonstrates how to return a JSP page in Spring Controller method. Note the usage of @Controller annotation and the @RequestMapping annotation. In case we want to return a JSP page we do not use the @ResponseBody annotation (shown in second example).
package net.javatutorial.tutorials;

import org.springframework.boot.SpringApplication;
import org.springframework.boot.autoconfigure.SpringBootApplication;
import org.springframework.stereotype.Controller;
import org.springframework.web.bind.annotation.RequestMapping;

@Controller
@SpringBootApplication
public class ControllerExampleJSP {

	@RequestMapping("/hellojsp")
	String helloJSP() {
		return("index");
	}

	public static void main(String[] args) {
		SpringApplication.run(ControllerExampleJSP.class, args);
	}
}
The @RequestMapping annotation poins the URL http://localhost:8080/hellojsp to controller’s method helloJSP(). This method returns the parsed content of index.jsp
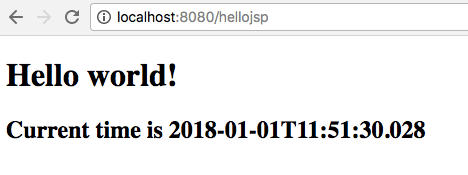
Rendered JSP page using Spring controller
Implementing Controller with ResponseBody
Unlike the previous example this one will return the String generated by the method and not a JSP page. The only thing we need to change is to add the @ResponseBody annotation to our controller method
package net.javatutorial.tutorials;

import org.springframework.boot.SpringApplication;
import org.springframework.boot.autoconfigure.SpringBootApplication;
import org.springframework.stereotype.Controller;
import org.springframework.web.bind.annotation.RequestMapping;
import org.springframework.web.bind.annotation.ResponseBody;


@Controller
@SpringBootApplication
public class ControllerResponseBodyExample {

	@RequestMapping("/helloresponsebody")
	@ResponseBody
	String helloResponseBody() {
		return("Hello World. This is produced by a method annotated with ResponseBody");
	}

	public static void main(String[] args) {
		SpringApplication.run(ControllerResponseBodyExample.class, args);
	}

}
Calling http://localhost:8080/helloresponsebody in your browser will produce following output:
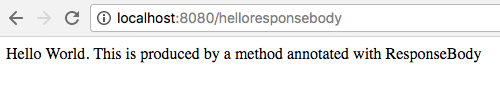
Output using Spring Controller and ResponseBody
Implementing Spring RestController
The @RestController annotation is used as convenience annotation to represent the annotations such as @Controller and @ResponseBody. When used at the class level, the controller can serve REST API requests.
package net.javatutorial.tutorials;

import org.springframework.boot.SpringApplication;
import org.springframework.boot.autoconfigure.SpringBootApplication;
import org.springframework.web.bind.annotation.RequestMapping;
import org.springframework.web.bind.annotation.RestController;

@RestController
@SpringBootApplication
public class RestControllerExample {

	@RequestMapping("/hellorest")
	String helloRest() {
		return("Hello World. This is produced by the rest conntroller method");
	}

	public static void main(String[] args) {
		SpringApplication.run(RestControllerExample.class, args);
	}

}
Calling http://localhost:8080/hellorest in your browser will produce following output:
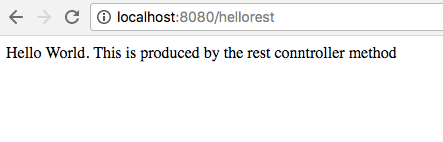
Output using Spring RestController
Using @RequestMapping Annotations at Method and Class Level
Spring 4.3 introduced annotations such as @GetMapping, @PostMapping, @PutMapping and so on to specify mappings for common HTTP method types such as GET, POST and PUT. These annotations enhance code readability.
Following example demonstrates how to use mapping annotations at both – method and class level.
package net.javatutorial.tutorials;

import org.springframework.boot.SpringApplication;
import org.springframework.boot.autoconfigure.SpringBootApplication;
import org.springframework.web.bind.annotation.GetMapping;
import org.springframework.web.bind.annotation.RequestMapping;
import org.springframework.web.bind.annotation.RestController;


@RestController
@RequestMapping("/user/*")
@SpringBootApplication
public class MethodAndClassLevelAnnotations {

	@RequestMapping
	String login() {
		return("Login method called");
	}

	@GetMapping("/logout")
	String logout() {
		return("Logout method called");
	}

	public static void main(String[] args) {
		SpringApplication.run(MethodAndClassLevelAnnotations.class, args);
	}

}
Making a request to following Url http://localhost:8080/user/ will call the login() method. Note that the @RequestMapping annotating the login() method has no parameters.
The @RequestMapping("/user/*") annotation used at class level serves as catch all method to handle all the requests with different paths represented by “/*”.
Requesting http://localhost:8080/user/logout will call the logout() method. The @GetMapping annotation is a composed annotation which acts as @RequestMapping(method = RequestMethod.GET)
You can find the code examples from this tutorial in our GitHub repo.