This tutorial will show you how to build a simple web app using Spring Framework and STS (Spring Tool Suite). It’s a beginner guide and it will help you if you are new to Spring or STS.
NOTE: This tutorial requires Spring STS to be installed and configured with Eclipse IDE. If you haven’t done this step yet please read Install Spring STS in Eclipse first.
What is Spring Boot
This tutorial uses Spring Boot to create a simple web-app with running on embedded Tomcat server.
Spring Boot is Spring’s solution for creating stand-alone applications that are easy to build and run. It uses preconfigured Spring platform and third-party libraries so you can get started within minutes. Most Spring Boot applications need very little Spring configuration. This particular example does not need any configuration at all.
Features of Spring Boot:
- Create stand-alone Spring applications
- Embed Tomcat or Jetty directly (no need to deploy WAR files)
- Provide POM file to simplify your Maven configuration
- Automatically configure Spring whenever possible
- Provide production-ready features such as metrics, health checks and externalized configuration
- Absolutely no code generation and no requirement for XML configuration
Create New Spring Starter Project
1. Start Eclipse and go to File -> New -> Other… or press Ctrl+N on your keyboard
In the search field type “spring”. This will list several Spring options. The one we need for this tutorial is “Spring Starter Project”. Select it and confirm with “Next” button
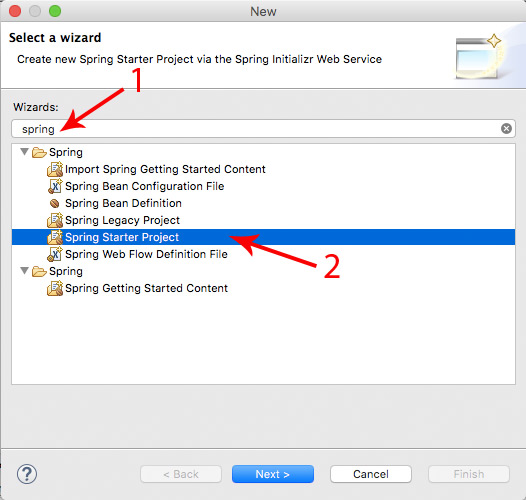
Create new Spring starter project
2. Use the setting shown in the screenshot below.
Choose a name for your project. Select Maven as build tool, JAR packaging and your Java version.
Under Package type the package name. Artifact is the name of the JAR file you are going to build. For example if you use springexample as artifact the final JAR file will be called springexample.jar
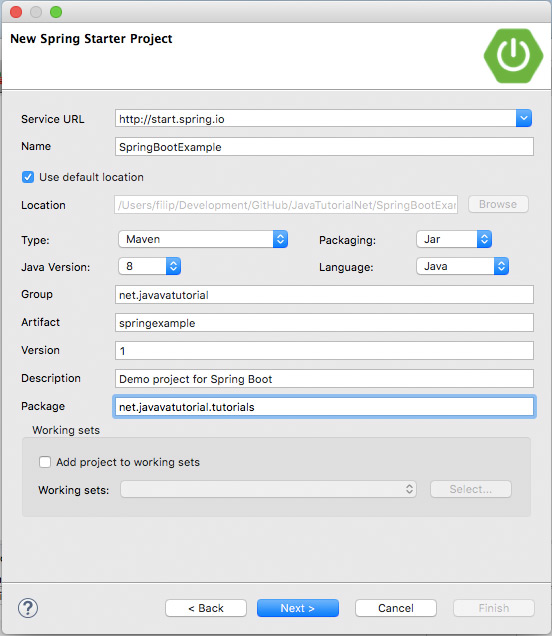
Spring starter project settings
3. In “New Spring Starter Project Dependencies” window select Web.
If you can’t find it in the list, use the search field and type into it “web”
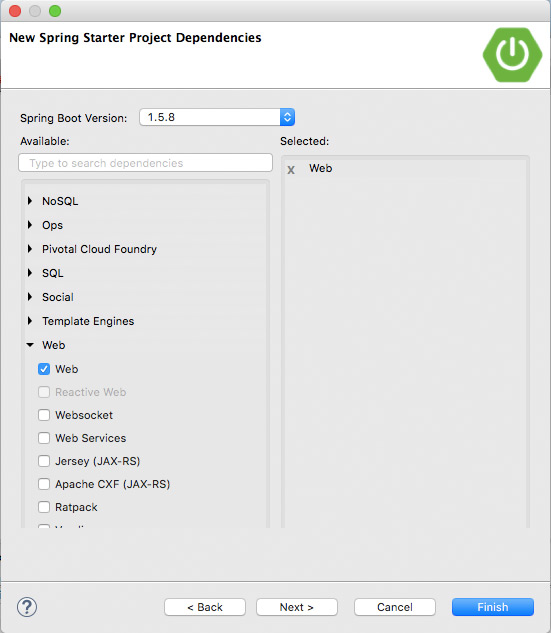
Create Spring web project
Confirm with “Finish” button. STS will create the project for you and download all needed dependencies.
4. Once the project is created you will see one main Java class called SpringBootExampleApplication.java, one Java class for testing purposes, empty properties file, a Maven POM file and 2 files to execute the application from command line. In the screenshot below you will see on the left the project structure and the content of the main class on the right.
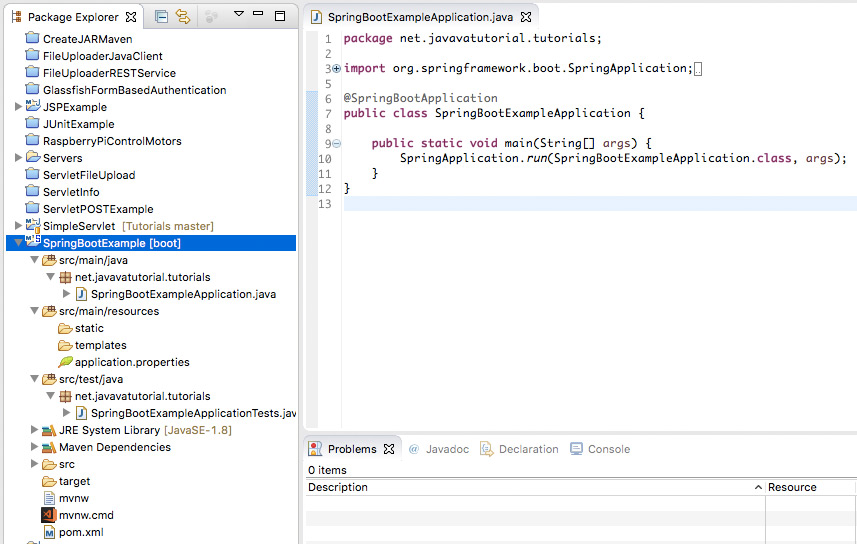
Spring Boot web-project structure
Run Your Spring Boot Application
Right-click your project, go to “Run As” and select “Spring Boot App”
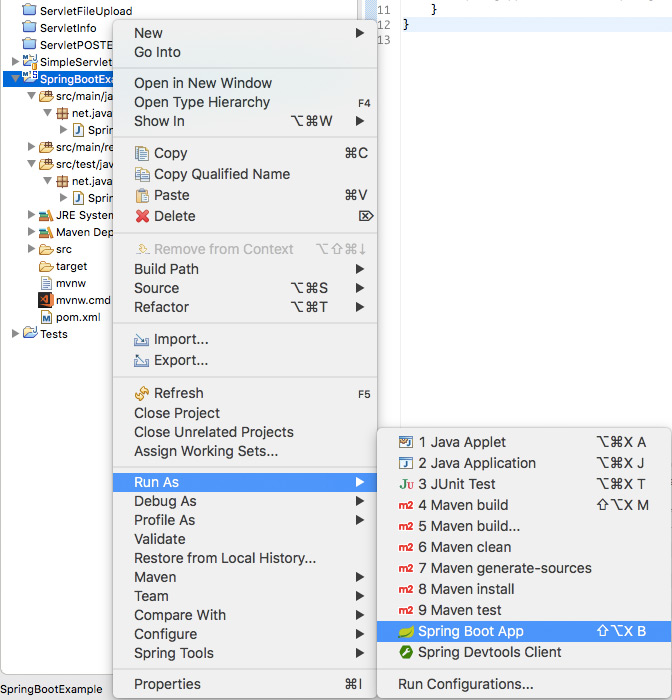
Run project as Spring boot app
This will bootstrap the embedded Tomcat server, deploy your app and map the URLs. In Eclipse console you will see an output similar to this one:
  .   ____          _            __ _ _
 /\\ / ___'_ __ _ _(_)_ __  __ _ \ \ \ \
( ( )\___ | '_ | '_| | '_ \/ _` | \ \ \ \
 \\/  ___)| |_)| | | | | || (_| |  ) ) ) )
  '  |____| .__|_| |_|_| |_\__, | / / / /
 =========|_|==============|___/=/_/_/_/
 :: Spring Boot ::        (v1.5.8.RELEASE)

2017-11-28 11:15:29.068  INFO 3428 --- [           main] n.j.t.SpringBootExampleApplication       : Starting SpringBootExampleApplication on Filips-MacBook-Air.local with PID 3428 (/Users/filip/Development/GitHub/JavaTutorialNet/SpringBootExample/target/classes started by filip in /Users/filip/Development/GitHub/JavaTutorialNet/SpringBootExample)
2017-11-28 11:15:29.081  INFO 3428 --- [           main] n.j.t.SpringBootExampleApplication       : No active profile set, falling back to default profiles: default
2017-11-28 11:15:29.163  INFO 3428 --- [           main] ationConfigEmbeddedWebApplicationContext : Refreshing org.springframework.boot.context.embedded.AnnotationConfigEmbeddedWebApplicationContext@4461c7e3: startup date [Tue Nov 28 11:15:29 EET 2017]; root of context hierarchy
2017-11-28 11:15:30.753  INFO 3428 --- [           main] s.b.c.e.t.TomcatEmbeddedServletContainer : Tomcat initialized with port(s): 8080 (http)
2017-11-28 11:15:30.773  INFO 3428 --- [           main] o.apache.catalina.core.StandardService   : Starting service [Tomcat]
2017-11-28 11:15:30.775  INFO 3428 --- [           main] org.apache.catalina.core.StandardEngine  : Starting Servlet Engine: Apache Tomcat/8.5.23
2017-11-28 11:15:30.949  INFO 3428 --- [ost-startStop-1] o.a.c.c.C.[Tomcat].[localhost].[/]       : Initializing Spring embedded WebApplicationContext
2017-11-28 11:15:30.949  INFO 3428 --- [ost-startStop-1] o.s.web.context.ContextLoader            : Root WebApplicationContext: initialization completed in 1791 ms
2017-11-28 11:15:31.201  INFO 3428 --- [ost-startStop-1] o.s.b.w.servlet.ServletRegistrationBean  : Mapping servlet: 'dispatcherServlet' to [/]
2017-11-28 11:15:31.206  INFO 3428 --- [ost-startStop-1] o.s.b.w.servlet.FilterRegistrationBean   : Mapping filter: 'characterEncodingFilter' to: [/*]
2017-11-28 11:15:31.207  INFO 3428 --- [ost-startStop-1] o.s.b.w.servlet.FilterRegistrationBean   : Mapping filter: 'hiddenHttpMethodFilter' to: [/*]
2017-11-28 11:15:31.208  INFO 3428 --- [ost-startStop-1] o.s.b.w.servlet.FilterRegistrationBean   : Mapping filter: 'httpPutFormContentFilter' to: [/*]
2017-11-28 11:15:31.208  INFO 3428 --- [ost-startStop-1] o.s.b.w.servlet.FilterRegistrationBean   : Mapping filter: 'requestContextFilter' to: [/*]
2017-11-28 11:15:31.684  INFO 3428 --- [           main] s.w.s.m.m.a.RequestMappingHandlerAdapter : Looking for @ControllerAdvice: org.springframework.boot.context.embedded.AnnotationConfigEmbeddedWebApplicationContext@4461c7e3: startup date [Tue Nov 28 11:15:29 EET 2017]; root of context hierarchy
2017-11-28 11:15:31.777  INFO 3428 --- [           main] s.w.s.m.m.a.RequestMappingHandlerMapping : Mapped "{[/error]}" onto public org.springframework.http.ResponseEntity<java.util.Map<java.lang.String, java.lang.Object>> org.springframework.boot.autoconfigure.web.BasicErrorController.error(javax.servlet.http.HttpServletRequest)
2017-11-28 11:15:31.779  INFO 3428 --- [           main] s.w.s.m.m.a.RequestMappingHandlerMapping : Mapped "{[/error],produces=[text/html]}" onto public org.springframework.web.servlet.ModelAndView org.springframework.boot.autoconfigure.web.BasicErrorController.errorHtml(javax.servlet.http.HttpServletRequest,javax.servlet.http.HttpServletResponse)
2017-11-28 11:15:31.820  INFO 3428 --- [           main] o.s.w.s.handler.SimpleUrlHandlerMapping  : Mapped URL path [/webjars/**] onto handler of type [class org.springframework.web.servlet.resource.ResourceHttpRequestHandler]
2017-11-28 11:15:31.820  INFO 3428 --- [           main] o.s.w.s.handler.SimpleUrlHandlerMapping  : Mapped URL path [/**] onto handler of type [class org.springframework.web.servlet.resource.ResourceHttpRequestHandler]
2017-11-28 11:15:31.871  INFO 3428 --- [           main] o.s.w.s.handler.SimpleUrlHandlerMapping  : Mapped URL path [/**/favicon.ico] onto handler of type [class org.springframework.web.servlet.resource.ResourceHttpRequestHandler]
2017-11-28 11:15:32.144  INFO 3428 --- [           main] o.s.j.e.a.AnnotationMBeanExporter        : Registering beans for JMX exposure on startup
2017-11-28 11:15:32.254  INFO 3428 --- [           main] s.b.c.e.t.TomcatEmbeddedServletContainer : Tomcat started on port(s): 8080 (http)
2017-11-28 11:15:32.271  INFO 3428 --- [           main] n.j.t.SpringBootExampleApplication       : Started SpringBootExampleApplication in 13.607 seconds (JVM running for 19.742)
Once the application is started, open your browser and navigate to http://localhost:8080
You will see a page labeled “Whitelabel Error Page”. This is totally fine. Don’t worry. It indicates that the server is started, but there is no mapping available for URL “/”. We will fix this in the next step.
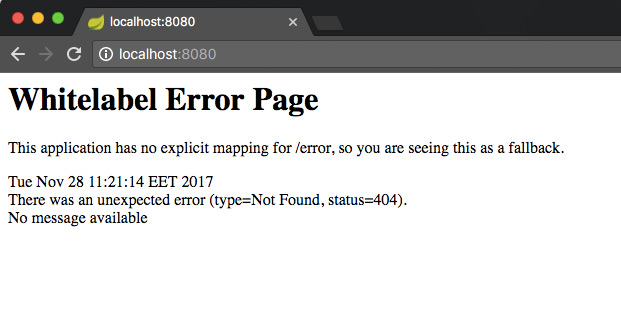
Spring whitelabel error page
Create a Request Mapping
Now, to be able to see some “meaningful” content under http://localhost:8080 we need to change the code of SpringBootExampleApplication.java a bid. First annotate the class with @Controller annotation. Second create a request mapping to URL “/” – this will map the home() method to this URL. In other words when the browser makes a GET request to http://localhost:8080 it will be served by this method. Finally to be able to return a response to the browser you need to annotate the home() method with @ResponseBody. You will find all the changes below:
package net.javavatutorial.tutorials;

import org.springframework.boot.SpringApplication;
import org.springframework.boot.autoconfigure.SpringBootApplication;
import org.springframework.stereotype.Controller;
import org.springframework.web.bind.annotation.RequestMapping;
import org.springframework.web.bind.annotation.ResponseBody;

@Controller
@SpringBootApplication
public class SpringBootExampleApplication {

	@RequestMapping("/")
	@ResponseBody
	String home() {
		return "Greetings from Java Tutorial Network";
	}

	public static void main(String[] args) {
		SpringApplication.run(SpringBootExampleApplication.class, args);
	}
}
Relaunch the Spring Boot App
Before you can see the changes you just did in the previous step you need to redeploy you changed app. To achieve this use the “Spring relaunch button” shown on the screenshot below
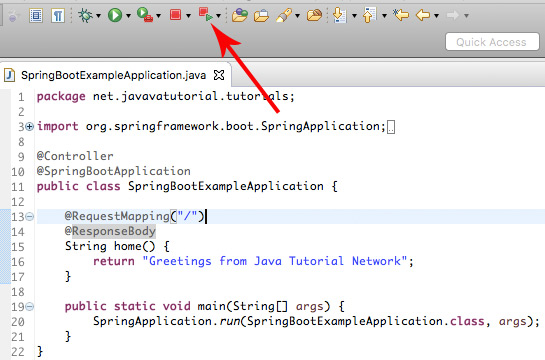
Spring relaunch button
Now go to your browser and refresh the page. You should see the string our home() method returns on the screen
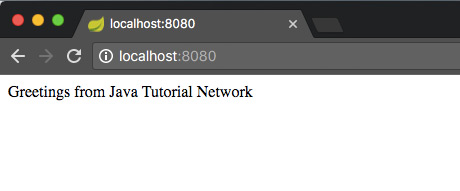
Program output
Complete source code of the project can be found in our GitHub repo under: https://github.com/JavaTutorialNetwork/Tutorials/tree/master/SpringBootExample


Well, it worked for me. How do you create a project that can be used over a network because I understand that’s how a web app should work
worked for me,
Thanks