In the previous tutorial we learned about List View layout with a simple example. This tutorial explains list adapter which is used to create custom lists.
Android ListAdapter
List view is very simple, do you want to customize your list? ListAdapter is used to customize list view layout. It behaves like a bridge between data source and a list view. Its parent class is BaseAdapter. It is used when you want to specify layout for individual rows in the list. Don’t confuse it with ArrayAdapter, ListAdapter is an interface while ArrayAdapter is a class which work with array of data. Following figure shows a custom list view by using ListAdapter.
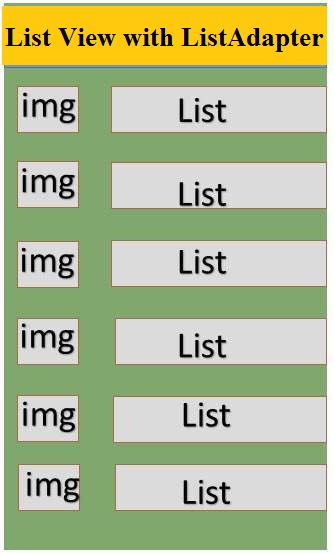
List Adapter
ListAdapter Constructor
Constructor of ListAdapter takes a parameter that specifies a layout resource for each row. Other than this it also has two more parameters (these two parameters are typically parallel arrays) which enable us to specify which data field to associate with which object in the row layout resource.
Methods of ListAadapter
ListAdapter has following public methods.
- areAllItemsEnabled( ): It tells if all items in list adapter are enabled or not, by returning a Boolean value. If it returns true, it means all items are selectable and clickable. If it returns different values (if value changes) there is no guarantee it will take effect.
- isEnabled( int position ): returns true if the item at a specific position is clickable and selectable. If position given is invalid then result can not be specified.
Example of ListAdapter
Let’s start coding with ListAdapter. In the previous tutorial of list view a simple example of computer science languages has been discussed. That was shown as a simple list. Now let’s do the same thing but in a different way. Instead of just displaying list of languages, display it with language icon.
First create a layout for each row, which has an image view and text view. Here is the code for list_single.xml
<?xml version="1.0" encoding="utf-8"?>
<TableLayout xmlns:android="http://schemas.android.com/apk/res/android"
    android:layout_width="match_parent"
    android:layout_height="match_parent" >
    <TableRow>
        <ImageView
            android:id="@+id/img"
            android:layout_width="100dp"
            android:layout_height="100dp"/>

        <TextView
            android:id="@+id/txt"
            android:layout_width="wrap_content"
            android:layout_height="100dp" />

    </TableRow>
</TableLayout>
Create a java class and name it as CustomList.java, here is code for it
package com.example.admin.listadapterexample;

import android.app.Activity;
import android.view.LayoutInflater;
import android.view.View;
import android.view.ViewGroup;
import android.widget.ArrayAdapter;
import android.widget.ImageView;
import android.widget.TextView;

public class CustomList extends ArrayAdapter<String>{

    private final Activity context;
    private final String[] web;
    private final Integer[] imageId;
    public CustomList(Activity context,
                      String[] web, Integer[] imageId) {
        super(context, R.layout.list_single, web);
        this.context = context;
        this.web = web;
        this.imageId = imageId;

    }
    @Override
    public View getView(int position, View view, ViewGroup parent) {
        LayoutInflater inflater = context.getLayoutInflater();
        View rowView= inflater.inflate(R.layout.list_single, null, true);
        TextView txtTitle = (TextView) rowView.findViewById(R.id.txt);

        ImageView imageView = (ImageView) rowView.findViewById(R.id.img);
        txtTitle.setText(web[position]);

        imageView.setImageResource(imageId[position]);
        return rowView;
    }
}
Now create a main activity and code for mainActivty.java is
package com.example.admin.listadapterexample;

import android.support.v7.app.AppCompatActivity;
import android.os.Bundle;

import android.os.Bundle;
import android.view.View;
import android.widget.AdapterView;
import android.widget.ListView;
import android.widget.Toast;
import android.app.Activity;

public class MainActivity extends Activity {
    ListView list;
    String[] web = {
            "Java",
            "C++",
            "C#",
            "HTML",
            "CSS"

    } ;
    Integer[] imageId = {
            R.drawable.java,
            R.drawable.cplus,
            R.drawable.csharp,
            R.drawable.html,
            R.drawable.download

    };

    @Override
    protected void onCreate(Bundle savedInstanceState) {
        super.onCreate(savedInstanceState);
        setContentView(R.layout.activity_main);

        CustomList listAdapter = new
                CustomList(MainActivity.this, web, imageId);
        list=(ListView)findViewById(R.id.list);
        list.setAdapter(listAdapter);
        list.setOnItemClickListener(new AdapterView.OnItemClickListener() {

            @Override
            public void onItemClick(AdapterView<?> parent, View view,
                                    int position, long id) {
                Toast.makeText(MainActivity.this, "You Clicked at " +web[+ position], Toast.LENGTH_SHORT).show();

            }
        });

    }

}
Here is how activty_main.xml layout looks like
<RelativeLayout xmlns:android="http://schemas.android.com/apk/res/android"
    xmlns:tools="http://schemas.android.com/tools"
    android:layout_width="match_parent"
    android:layout_height="match_parent"
    tools:context=".MainActivity" >

    <ListView
        android:id="@+id/list"
        android:layout_width="wrap_content"
        android:layout_height="wrap_content" >

    </ListView>

</RelativeLayout>
Run your app here is the output
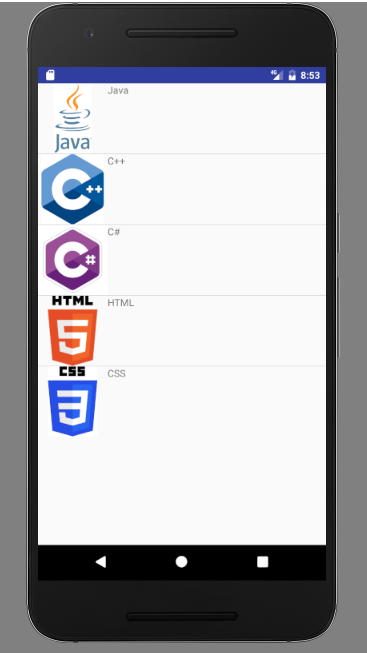
list adapter example
You can download this code by clicking this link.


This code only supporting API below 19
How should I make work of this code for API above 20