In this tutorial I will show you how to create Servlets and deploy them in Apache Tomcat 8
What are Servlets?
Servlets are the building blocks of almost every java web application. They provide the core functionality to accept HTTP requests and return HTTP responses to the user. Even if you use JSP to build your web pages, the JSP files are eventually compiled to Servlets by the application server or web container such as Glassfish or Tomcat. Servlets are essential for your web container to do it’s job, serving GET, POST, HEAD, PUT, DELETE, OPTIONS and TRACE requests and return a response to web clients. You are most probably familiar with GET and POST requests. I strongly recommend to invest some time and read about the other types of request listed above. If you don’t know them yet, go and read this paper now https://www.w3.org/Protocols/rfc2616/rfc2616-sec9.html .
Servlet Project Structure
In our first example we will build a simple Servlet printing the message “Hello world” in your browser – how trivial, isn’t it. We will use Maven to build the project. We will create one Servlet class and a web.xml file. The web.xml file also called deployment descriptor gives information to the web container how to handle your servlets. Think of it as a configuration file. Following picture shows the file structure of our project
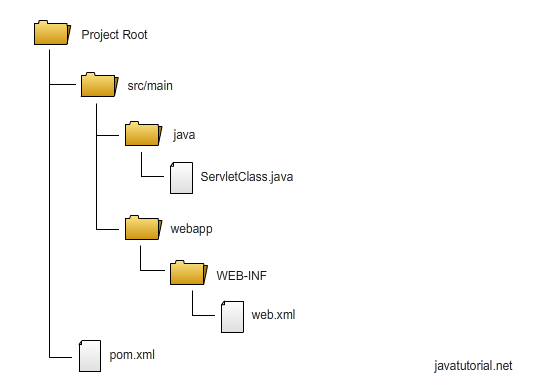
Project file structure
You can find the complete source code of our servlet example in GitHub https://github.com/JavaTutorialNetwork/Tutorials/tree/master/SimpleServlet
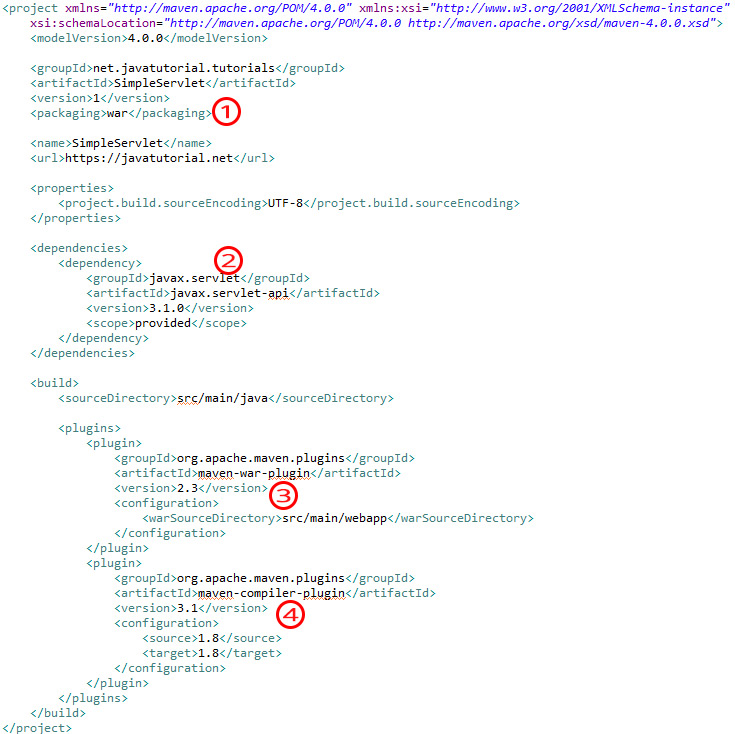
Project POM File
The maven build pom.xml file for our Servlet projects looks like this:
<project xmlns="http://maven.apache.org/POM/4.0.0" xmlns:xsi="http://www.w3.org/2001/XMLSchema-instance"
	xsi:schemaLocation="http://maven.apache.org/POM/4.0.0 http://maven.apache.org/xsd/maven-4.0.0.xsd">
	<modelVersion>4.0.0</modelVersion>

	<groupId>net.javatutorial.tutorials</groupId>
	<artifactId>SimpleServlet</artifactId>
	<version>1</version>
	<packaging>war</packaging>

	<name>SimpleServlet</name>
	<url>https://javatutorial.net</url>

	<properties>
		<project.build.sourceEncoding>UTF-8</project.build.sourceEncoding>
	</properties>

	<dependencies>
		<dependency>
			<groupId>javax.servlet</groupId>
			<artifactId>javax.servlet-api</artifactId>
			<version>3.1.0</version>
			<scope>provided</scope>
		</dependency>
	</dependencies>

	<build>
		<sourceDirectory>src/main/java</sourceDirectory>

		<plugins>
			<plugin>
				<groupId>org.apache.maven.plugins</groupId>
				<artifactId>maven-war-plugin</artifactId>
				<version>2.3</version>
				<configuration>
					<warSourceDirectory>src/main/webapp</warSourceDirectory>
				</configuration>
			</plugin>
			<plugin>
				<groupId>org.apache.maven.plugins</groupId>
				<artifactId>maven-compiler-plugin</artifactId>
				<version>3.1</version>
				<configuration>
					<source>1.8</source>
					<target>1.8</target>
				</configuration>
			</plugin>
		</plugins>
	</build>
</project>
Lets tear-down the pom file and take a look at the important stuff:
- We need to set the packaging to
war. Web applications in Tomcat are packed into WAR files (Web archives) encapsulating all the data of the app. The name of the WAR file is build upon thearifactIdand theversionparameters you set in your maven pom file. The name of our WAR file in this case will beSimpleServlet-1.war - The dependency we need to create servlets is
javax.servlet-api. We set the scope to “provided” because Tomcat has all the libraries required already build in. - We need the Maven WAR plugin to be able to create the WAR file
- In the compiler section of the WAR plugin set 1.8. This means the classes will be compiled with Java 8
Simple Servlet Example
Lets look at the source code of a very basic servlet, printing the message “Hello World!” in the web browser
package net.javatutorial.tutorials;

import java.io.IOException;

import javax.servlet.ServletException;
import javax.servlet.http.HttpServlet;
import javax.servlet.http.HttpServletRequest;
import javax.servlet.http.HttpServletResponse;

public class SimpleServlet extends HttpServlet {

	private static final long serialVersionUID = -4751096228274971485L;

	@Override
	protected void doGet(HttpServletRequest reqest, HttpServletResponse response)
			throws ServletException, IOException {
		response.getWriter().println("Hello World!");
	}

	@Override
	public void init() throws ServletException {
		System.out.println("Servlet " + this.getServletName() + " has started");
	}

	@Override
	public void destroy() {
		System.out.println("Servlet " + this.getServletName() + " has stopped");
	}

}
All servlets need to extend the abstract class HttpServlet. HttpServlet provides all the methods to build a HTTP response – what we do here is override some of the methods to put our own logic.
doGet method is executed when the client (browser) makes a GET request to our servlet. In our example it will just return the text response “Hello World!”.
init() method is called once when the servlet is started for the first time by the web container. This happens either on application deployment or the first call to this servlet. The init method can be used to set a database connection or other time consuming initialization operations.
destroy() method is called when the servlet is terminated by the web container. We can use this method to shut down connections to our database or other open resources.
Creating the web.xml Deployment Descriptor
The web.xml file is used to tell the web container how to handle the files in our web app. Think of it as a configuration file.
<?xml version="1.0" encoding="UTF-8"?>

<web-app xmlns="http://xmlns.jcp.org/xml/ns/javaee"
	xmlns:xsi="http://www.w3.org/2001/XMLSchema-instance"
	xsi:schemaLocation="http://xmlns.jcp.org/xml/ns/javaee http://xmlns.jcp.org/xml/ns/javaee/web-app_3_1.xsd"
	version="3.1">

	<display-name>Simple Servlet Application</display-name>

	<servlet>
		<servlet-name>simpleServlet</servlet-name>
		<servlet-class>net.javatutorial.tutorials.SimpleServlet</servlet-class>
		<load-on-startup>1</load-on-startup>
	</servlet>

	<servlet-mapping>
		<servlet-name>simpleServlet</servlet-name>
		<url-pattern>/hello</url-pattern>
	</servlet-mapping>

</web-app>
display-name the application will be listed under this name in Tomcat Manager. Read this tutorials to learn how to configure Tomcat manager and how to deploy applications with Tomcat manager.
the <servlet> tag holds the configuration of our servlet. <servlet-name> is the alias of our servlet, it is used to configure other properties of the servlet in the web.xml file. <servlet-class> is the path to our servlet. <load-on-startup>1</load-on-startup> means the servlet will be loaded into the web-container when Tomcat starts. If you have other servlets in your project you can set load-on-startup values like 2,3, 100 etc. The servlets with the lowest values have bigger priority and will load first.
<servlet-mapping> is used to give a servlet a URL. In our example we give the pattern /hello to our servlet meaning the full URL to access the servlet on your local server will be http://localhost:8080/SimpleServlet/hello
Build and Deploy the Example
After you build the source you will get a ready to deploy WAR file. The WAR will contain the compiled servlet class and the deployment descriptor file web.xml .

WAR file structure
If you need additional info on how to deploy the WAR file, please refer to this tutorials How to Deploy and Undeploy Applications in Tomcat

Hello?
In which folder should I put SimpleServlet.java?
I can’t find it in this tutorial.
Please take a look at the full source code in GitHub. You will find the project structure there
How to get file from resources in servlet?
Thanks for sharing filip. After deploying this servlet under tomcat 9, the path that works is http://localhost:8080/SimpleServlet-1/hello and not http://localhost:8080/SimpleServlet/hello.
This is not a tutorial for beginners.
There are plenty of steps missing.