In this tutorial you will learn the very basic Git commands, allowing you run Git in just a few minutes.
What is Git?
Git is a widely used distributed revision control system. It was initially developed in year 2005 and it’s most current version since 2015-10-04 is 2.7. It is supported on all major operating systems like Linux, OSX and Microsoft Windows.
or install git on Linux, running following command:
$ sudo yum install git-all
or this one on Debian-based distributions like Ubuntu
$ sudo apt-get install git-all
Create new Git repository
You can create a local repository by making a folder on your hardrive, navigate to that folder and execute:
git init
Although working with local repositories is very proficient in many ways and you can experiment with it, I will highly recommend using a remote Git server and hosting like GitHub for example. GitHub has a nice interface to manage, crate and maintain your repositories as well as advanced tools to monitor contributions and users.
Git workflow
There is a 3-step approach to bring your code from your working directory to the remote repository:
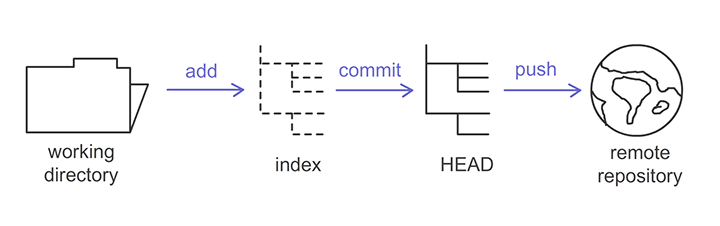
Git workflow
Working directory – it holds the actual files
Index – is the staging area marking your code changes
HEAD – holds the last commit you have made
Remote server – is the final destination where your code goes, so your changes are available to another developers
Checkout Git repository
To make a working local copy of an existing repository execute:
git clone {path_to_repository}
This will download a copy of the repository in your current directory.
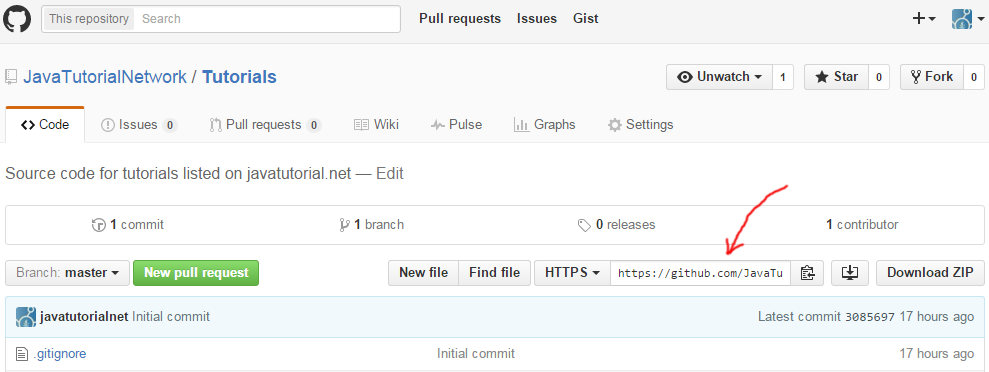
For example if you want to clone a repository, hosted in GitHub, run following command:
git clone https://github.com/JavaTutorialNetwork/Tutorials.git
In GitHub you can find the repository path here:
GitHub repository path
Update your local repository
Before you begin to make your changes on the code it is always a good practice to check first for code updates done by other developers on your team. To do this execute:
git pull
Step 1 – add changes to index
You can submit your code changes to the index using either:
git add <filename>
for a specific file or
git add *
to submit all files
Step 2 – commit changes to HEAD
In this step you actually commit your changes to HEAD. After this all your work is ready to be transferred to the remote repository
git commit -m "Message explaining your changes"
Step 3 – push changes to remote server
In this step you will populate your changes to the remote Git server making them available to other developers
git push origin master
This will push the changes to the master branch (the default one). If you like to push them to another branch just change the name
Undo local changes
In some cases, for example you did something wrong, you will want to replace and overwrite your local changes with the code found in Git’s remote repository. To do this execute:
git fetch origin
git reset --hard origin/master
This will wipe out all your local work (the one you have not pushed to the remote server yet) and sync your working directory to the current repo state.
As always comments are welcome 🙂