This tutorial explains relative layout in Android with example.
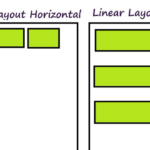
Layouts in Android are very important for GUI based apps. In previous tutorial we learned linear layout, this tutorial explains relative layout in Android.
Relative layout
Relative layout as the name suggests, shows position of components relative to each other. The position can be specified with respect to consecutive elements or to the parent component. Relative layout is most flexible layout provided by Android. It lets you position elements on the screen. By default, it sets all components at the top left of the layout. Following figure shows how relative layout looks like,
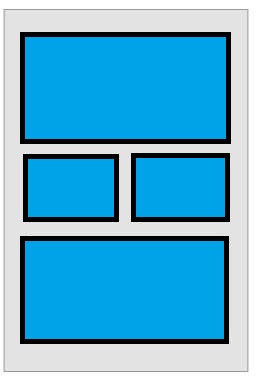
relative layout
Relative layout attributes
Following are attributes of relative layout.
- Id: Defines if of layout
- Gravity: It specifies position of object in x-y plan.
- IgnoreGravity: It is added to ignore gravity on a specific component.
Relative layout constructors
Relative layout has four different constructors
- RelativeLayout( Contetxt context)
- RelativeLayout( Contetxt context, AttributeSet attrs)
- RelativeLayout( Contetxt context, AttributeSet attrs, int defStyleAttribute)
- RelativeLayout( Contetxt context, AttributeSet attrs, int defStyleAttribute, int defStyleRes)
Methods of relative layout
Following are several important methods of relative layout
- setGravity(): It sets gravity of the child views as centered, left or right.
- setHorizontalGravity(): Used to positioned elements horizontally.
- setVerticalGravity(): Used to positioned elements vertically.
- requestLayout(): Used to request layout.
- setIgnoreGravity(): Used to ignore gravity of any particular element.
- getGravity(): Used to get the position of elements.
- getAccessibilityClassName(): Returns class name of object.
XML attributes of relative layout
Relative layout has following XML attributes.
android: layout_above, It position the bottom edge of the given component above the given component ID.
android: layout_alignBaseline, It position the baseline of given component above the baseline of given component ID.
android: layout_alignBottom, It aligns at the bottom of given component ID.
android: layout_alignEnd, It aligns at the end of given component ID.
android: layout_alignLeft, It position the component left to the given component ID.
android: layout_alignRight, It position the component right to the given component ID.
Relative layout example
Following example shows relative layout in Android. Create an empty activity and drag relative layout from the palette on to the screen. And then drag your required GUI components. Here is the xml file.
<?xml version="1.0" encoding="utf-8"?>

<RelativeLayout android:layout_width="368dp"
    android:layout_height="495dp"
    xmlns:tools="http://schemas.android.com/tools"
    tools:layout_editor_absoluteX="8dp"
    tools:layout_editor_absoluteY="8dp"
    xmlns:android="http://schemas.android.com/apk/res/android">

        <TextView
            android:id="@+id/textView"
            android:layout_width="wrap_content"
            android:layout_height="wrap_content"
            android:layout_alignParentLeft="true"
            android:layout_alignParentStart="true"
            android:layout_alignParentTop="true"
            android:layout_marginLeft="141dp"
            android:layout_marginStart="141dp"
            android:layout_marginTop="89dp"
            android:text="Sign In"
            android:textColor="@android:color/black"
            android:textColorLink="@android:color/black"
            android:textSize="28sp" />

        <TextView
            android:id="@+id/textView2"
            android:layout_width="wrap_content"
            android:layout_height="wrap_content"
            android:layout_marginTop="43dp"
            android:text="ID"
            android:textColor="@android:color/black"
            android:textSize="18sp"
            android:typeface="normal"
            android:layout_below="@+id/textView"
            android:layout_alignLeft="@+id/textView5"
            android:layout_alignStart="@+id/textView5"
            android:layout_marginLeft="10dp"
            android:layout_marginStart="10dp" />

        <EditText
            android:id="@+id/editText"
            android:layout_width="wrap_content"
            android:layout_height="wrap_content"
            android:ems="10"
            android:inputType="textPersonName"
            android:text="Enter ID"
            android:layout_alignBaseline="@+id/textView2"
            android:layout_alignBottom="@+id/textView2"
            android:layout_alignLeft="@+id/editText2"
            android:layout_alignStart="@+id/editText2" />

    <TextView
        android:id="@+id/textView5"
        android:layout_width="wrap_content"
        android:layout_height="wrap_content"
        android:textSize="18sp"
        android:textColor="@android:color/black"
        android:text="Password"
        android:layout_alignBottom="@+id/editText2"
        android:layout_alignParentLeft="true"
        android:layout_alignParentStart="true"
        android:layout_marginLeft="32dp"
        android:layout_marginStart="32dp" />

    <EditText
        android:id="@+id/editText2"
        android:layout_width="wrap_content"
        android:layout_height="wrap_content"
        android:layout_alignParentEnd="true"
        android:layout_alignParentRight="true"
        android:layout_below="@+id/editText"
        android:ems="10"
        android:text="Password"
        android:inputType="textPassword" />

    <Button
        android:id="@+id/S"
        android:layout_width="wrap_content"
        android:layout_height="wrap_content"
        android:layout_alignParentEnd="true"
        android:layout_alignParentRight="true"
        android:layout_below="@+id/editText2"
        android:layout_marginTop="32dp"
        android:text="SignIn" />
</RelativeLayout>
Here is the output how it looks
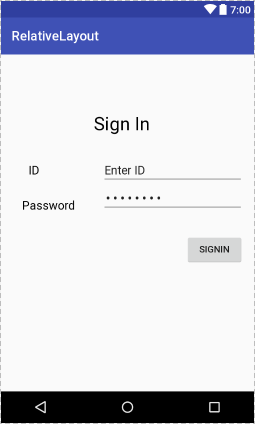
relative layout example
You can download the source code from this link.