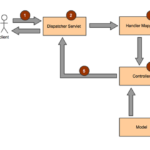
Controllers’ main purposes in Spring are intercepting incoming http requests, sends data to Model for processing and finally gets processed data from the Model and passes the very same data to View which is going to render it.

A very top-level overview of the written above:
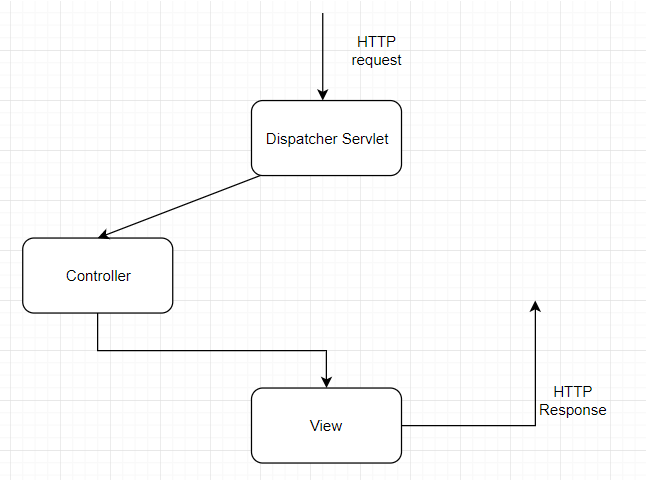
Workflow in Spring
Now, let’s build a simple app which will serve as an example of how to implement controllers in Spring.
When you want to “declare” a class to be a controller it is as simple as annotating it with @Controller. When used at the class level, the controller can now serve REST API requests.
GetMapping annotation
When you use @Controller annotation the request mappings can be provided by using the RequestMapping annotation for the method. There are also @RequestMapping, @PostMapping, @PutMapping that simplify mappings for common HTTP method types.
package com.example.demo;

import org.springframework.boot.SpringApplication;
import org.springframework.boot.autoconfigure.SpringBootApplication;
import org.springframework.stereotype.Controller;
import org.springframework.web.bind.annotation.RequestMapping;
import org.springframework.web.bind.annotation.ResponseBody;

@RestController
@SpringBootApplication
public class DemoApplication {

	@GetMapping("/")
	String home() {
		return "Greetings from Java Tutorial Network";
	}

	public static void main(String[] args) {
		SpringApplication.run(DemoApplication.class, args);
	}

}
The code snippet above, we have created a DemoApplication which is annotated as @Controller and @SpringBootApplication. Note the use of @GetRequest(“/”). This is saying that home() method will be displaying whatever is put in the annotation, in this case “/” which is http://localhost:8080/.
In the example, I am using @RestConroller which is basically a specialized version of the controller which includes @Controller and @ResponseBody annotations. It just simplifies the controller implementation.
When we run the code above, we get the following result:

Output
If we wanted to implement a simple login functionality, we would do the following:
package com.example.demo;

import org.springframework.stereotype.Controller;
import org.springframework.web.bind.annotation.RequestMapping;

@Controller
@RequestMapping("/account/*")
public class AccountController {
	@RequestMapping
	public String login() {
		return "login";
	}
}
What we did here is, we annotated both the class AccountController and the method login(). When the http://localhost:8080/account/ is accessed, we will be taken to the login page. Please note the “/” in the end of the url. If it wasn’t there, for example http://localhost:8080/account, would result in an error.
The reason I have the ‘*’ after account/ is because if we wanted to add more to it, like signup for example, the URL will be able to handle all requests with different paths.
For now though, we will be sticking to login only. What we need to do next is we need to create a class for the Login and annotate it as a @Controller:
package com.example.demo;

import org.springframework.stereotype.Controller;
import org.springframework.web.bind.annotation.RequestMapping;
import org.springframework.web.bind.annotation.RequestMethod;

@Controller
@RequestMapping("/account/login")
public class Login {
	@GetMapping
	public String login() {
		return "login";
	}
}
Now when we access http://localhost:8080/account/login it will return whatever is in the “login.jsp” file.