In this tutorial I will show you how to use the build-in Glassfish authentication mechanisms to create web based applications with user login.
Authentication is widely used in all kind of web-apps today. From online shops, trough social media and miscellaneous service that require the user to log in. Glassfish comes with integrated authentication and authorization mechanisms to let users login and maintain session within your application. We will take advantage of this feature and build and application to allow users to sign up and sign in to access authorized content. Finally I will show you how to create a logout function to allow the user to terminate the session.
This is a full blown Java EE tutorial, which requires DB setup, Glassfish configuration, development of the the authentication back-end logic and creating the front-end part. I will use Glassfish 4, MySQL database and JSF 2.2 to build the front-end. The code will also work on Payara 4 Server and other databases (MSSQL, Oracle, etc.) without any modifications.
Project Description
We will create a simple web-app with one registration form, a login form and one private page. The private page will be accessible after user login. All fields in the forms will be validated against incorrect user input.
Create the Database tables
Before you continue, make sure you configured your Glassfish server with your database. If you haven’t done this yet, read How to Configure Glassfish 4 with MySQL first. Of course you can use any other database you like to follow this tutorial. You are not limited to MySQL.
There are several places you can store user credentials, like databases, files, LDAP etc. In this tutorial we are going to use a Database to store the user names and passwords. This is called a JDBC security realm in Glassfish. There are 2 tables required to create a security realm – first one is used to store user credentials and the second one is to map particular user to a role. Roles are not predefined by Glassfish, which means we can create our own roles – administrator, user, moderator, viewer etc. To keep this tutorial as short as possible I will implement only one role: user
First table is called users with following fields:
- email – unique, primary field. We will use the user’s email address as username, you can take a plain old username if you like
- password – SHA-256 encoded user password. Never store user passwords as plain text – that’s not good 😉
- name – the name of the user
Only username and password fields are mandatory for Glassfishe’s security realm. I added name here, to demonstrate you can add additional info for your users in the same table
CREATE TABLE `users` (
  `email` varchar(255) NOT NULL,
  `password` varchar(64) NOT NULL,
  `name` varchar(30) NOT NULL,
  PRIMARY KEY (`email`)
) ENGINE=InnoDB DEFAULT CHARSET=utf8;
The user_groups table has 2 mandatory fields:
- email – it’s the username
- groupname – to store user’s role like administrator, user, moderator, viewer etc.
CREATE TABLE `user_groups` (
    `email` VARCHAR(255) NOT NULL,
    `groupname` VARCHAR(32) NOT NULL,
    PRIMARY KEY (`email`)
) ENGINE=InnoDB DEFAULT CHARSET=utf8;
Project Structure
Before you begin implementing the back-end part of the project I would like to show you the project structure. This way you will know where all the files belong
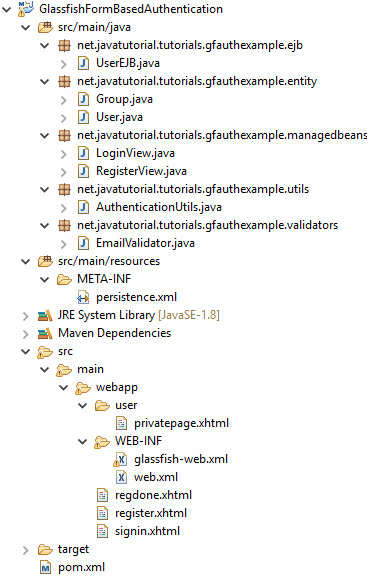
You will find the complete source-code in GitHub at https://github.com/JavaTutorialNetwork/Tutorials/tree/master/GlassfishFormBasedAuthentication
Project Dependencies (pom.xml file)
This is a pure Java EE 7 implementation and we don’t need additional dependencies in the project, except of the Java Enterprise API itself. The API is already included in Glassfish, so you should mark the dependency as provided
<project xmlns="http://maven.apache.org/POM/4.0.0" xmlns:xsi="http://www.w3.org/2001/XMLSchema-instance"
	xsi:schemaLocation="http://maven.apache.org/POM/4.0.0 http://maven.apache.org/xsd/maven-4.0.0.xsd">

	<modelVersion>4.0.0</modelVersion>

	<groupId>net.javatutorial.tutorials</groupId>
	<artifactId>GlassfishFormBasedAuthentication</artifactId>
	<version>1</version>
	<packaging>war</packaging>

	<properties>
		<project.build.sourceEncoding>UTF-8</project.build.sourceEncoding>
	</properties>

	<dependencies>
		<dependency>
			<groupId>javax</groupId>
			<artifactId>javaee-api</artifactId>
			<version>7.0</version>
			<scope>provided</scope>
		</dependency>
	</dependencies>

	<build>
		<finalName>authexample</finalName>
		<plugins>
			<plugin>
				<groupId>org.apache.maven.plugins</groupId>
				<artifactId>maven-war-plugin</artifactId>
				<version>2.3</version>
				<configuration>
					<webXml>src/main/webapp/WEB-INF/web.xml</webXml>
				</configuration>
			</plugin>
			<plugin>
				<groupId>org.apache.maven.plugins</groupId>
				<artifactId>maven-compiler-plugin</artifactId>
				<version>3.1</version>
				<configuration>
					<source>1.8</source>
					<target>1.8</target>
				</configuration>
			</plugin>
		</plugins>
	</build>

</project>
User and Group Entities
After you add the tables users and user_groups in your database you have to create the JPA entities for those two tables. The entities will map database tables into Java objects, so you ca easily modify or fetch the database using the getter and setter methods in your entity object. Use @Entity annotation to mark a java class as entity. The class must also implement Serializable interface.
Here is the code for the User entity
package net.javatutorial.tutorials.gfauthexample.entity;

import java.io.Serializable;

import javax.persistence.Column;
import javax.persistence.Entity;
import javax.persistence.Id;
import javax.persistence.NamedQueries;
import javax.persistence.NamedQuery;
import javax.persistence.Table;

@Entity
@NamedQueries({
	@NamedQuery(name = "findUserById", query = "SELECT u FROM User u WHERE u.email = :email")
})
@Table(name="users")
public class User implements Serializable {

	private static final long serialVersionUID = -5892169641074303723L;

	@Id
	@Column(name="email", nullable=false, length=255)
	private String email;

	@Column(name="password", nullable=false, length=64)
	private String password;

	@Column(name="name", nullable=false, length=30)
	private String name;

	public User(){}

	public User(String email, String password, String name) {
		this.email = email;
		this.password = password;
		this.name = name;
	}

	public String getEmail() {
		return email;
	}

	public void setEmail(String email) {
		this.email = email;
	}

	public String getPassword() {
		return password;
	}

	public void setPassword(String password) {
		this.password = password;
	}

	public String getName() {
		return name;
	}

	public void setName(String name) {
		this.name = name;
	}
}
At line #14 a NamedQuery “findUserById” is defined. We will use this query later in the project to:
- verify if e-mail given during registration is not used already for another registration
- to display user’s name and e-mail after login
At line #11 the User entity is mapped to database table “users” with the @Table annotation
At line #18 @Id annotation is used to denote “email” as primary field
@Column annotation is used to map a field from the java class to a field in the table
Group entity
package net.javatutorial.tutorials.gfauthexample.entity;

import java.io.Serializable;

import javax.persistence.Column;
import javax.persistence.Entity;
import javax.persistence.Id;
import javax.persistence.Table;

@Entity
@Table(name="user_groups")
public class Group implements Serializable {

	private static final long serialVersionUID = 1528447384986169065L;

	public static final String USERS_GROUP = "users";

	@Id
	@Column(name="email", nullable=false, length=255)
	private String email;

	@Column(name="groupname", nullable=false, length=32)
	private String groupname;

	public Group() {}

	public Group(String email, String groupname) {
		this.email = email;
		this.groupname = groupname;
	}

	public String getEmail() {
		return email;
	}

	public void setEmail(String email) {
		this.email = email;
	}

	public String getGroupname() {
		return groupname;
	}

	public void setGroupname(String groupname) {
		this.groupname = groupname;
	}

}
The field groupname is used to give a role to given user. This table is a mapping table with user id mapped to some role. To keep this example simple, all accounts created in this tutorial will have the “users” role. You can add more roles if you need to. Roles are not predefined, you can name them as you like. The difference between the roles comes with your implementation. For example if you have “administrator” role, you will want to give it more privileges than “users”. You have to restrict the one role and give more options to the other one programatically , managing this in your own code.
The persistence.xml File
<?xml version="1.0" encoding="UTF-8"?>

<persistence xmlns="http://java.sun.com/xml/ns/persistence"
	xmlns:xsi="http://www.w3.org/2001/XMLSchema-instance"
	xsi:schemaLocation="http://java.sun.com/xml/ns/persistence
	http://java.sun.com/xml/ns/persistence/persistence_2_0.xsd"
	version="2.0">

	<persistence-unit name="tutorialsPU" transaction-type="JTA">
		<provider>org.eclipse.persistence.jpa.PersistenceProvider</provider>
		<jta-data-source>jdbc/tutorialsDS</jta-data-source>
		<class>net.javatutorial.tutorials.gfauthexample.entity.User</class>
		<class>net.javatutorial.tutorials.gfauthexample.entity.Group</class>

		<properties>
			<!--  tables will be created only if they do not exist. Use for production
			<property name="eclipselink.ddl-generation" value="create-tables"/>
			-->

			<!--  will first drop the existing table, and then create the new table. Use for development
			<property name="eclipselink.ddl-generation" value="drop-and-create-tables"/>
			-->
			<property name="eclipselink.logging.level" value="INFO"/>
		</properties>
	</persistence-unit>

</persistence>
In this file we specify the persistence layer attributes. First we create a named persistence-unit tutorialsPU. We are going to use this persistence unit in EJBs to create isolated PersistenceContext for the EntityManager. Second, we specify which data-source we are going to use for this persistence-unit. Data sources are configured in Glassfish Admin Console (read How to Configure Glassfish 4 with MySQL for more details). Third, we list the entity classes which we want to include in the persistence unit. In our case those are the User and the Group classes, we created in previous step.
I also included two additional properties you may find useful. You can comment them out if you like:
This property will generate the database tables if they do not exist
<property name="eclipselink.ddl-generation" value="create-tables"/>
This property wipes the existing tables when you deploy the application and creates fresh (empty) tables based on your entity classes. You can use this for development
<property name="eclipselink.ddl-generation" value="drop-and-create-tables"/>
Writing the Business Layer – UserEJB
In this step we will write a Enterprise Java Bean (EJB) to insert new users in the database and query them. EJBs are often used as a mediators between the persistence layer (database entities) and the presentation layer (managed beans and JSF pages).
package net.javatutorial.tutorials.gfauthexample.ejb;

import java.util.logging.Level;
import java.util.logging.Logger;

import javax.ejb.Stateless;
import javax.persistence.EntityManager;
import javax.persistence.PersistenceContext;
import javax.persistence.TypedQuery;

import net.javatutorial.tutorials.gfauthexample.entity.Group;
import net.javatutorial.tutorials.gfauthexample.entity.User;
import net.javatutorial.tutorials.gfauthexample.utils.AuthenticationUtils;


@Stateless
public class UserEJB {

	@PersistenceContext(unitName="tutorialsPU")
	private EntityManager em;

	public User createUser(User user) {
		try {
			user.setPassword(AuthenticationUtils.encodeSHA256(user.getPassword()));
		} catch (Exception e) {
			Logger.getLogger(getClass().getName()).log(Level.SEVERE, null, e);
			e.printStackTrace();
		}

		Group group = new Group();
		group.setEmail(user.getEmail());
		group.setGroupname(Group.USERS_GROUP);

		em.persist(user);
		em.persist(group);

		return user;
	}

	public User findUserById(String id) {
		TypedQuery<User> query = em.createNamedQuery("findUserById", User.class);
		query.setParameter("email", id);
		User user = null;
		try {
			user = query.getSingleResult();
		} catch (Exception e) {
			// getSingleResult throws NoResultException in case there is no user in DB
			// ignore exception and return NULL for user instead
		}
		return user;
	}
}
Note the bean is annotated as @Stateless at line #16
At line #19 the EntityManager is pointed to “tutorialsPU” as persistence unit, all done with the @PersistenceContext annotation. We specified the persistence unit in persistence.xml file
The createUser method first encodes the plain text password into SHA-256 String, than stores both objects – User and Group to the database.
findUserById method will return a User object or NULL, if the user is not found in the database. Note the usage of try-catch here. If user with given id (email) is not found the call to query.getSingleResult() will throw a NoResultException. We are going to ignore the exception and return a NULL user instead. We will handle the NULL in our Managed Bean later.
Utility method to encode password as SHA-256
package net.javatutorial.tutorials.gfauthexample.utils;

import java.io.UnsupportedEncodingException;
import java.security.MessageDigest;
import java.security.NoSuchAlgorithmException;

import javax.xml.bind.DatatypeConverter;

public final class AuthenticationUtils {

	/**
	 * Returns SHA-256 encoded string
	 * @param password - the string to be encoded
	 * @return SHA-256 encoded string
	 * @throws UnsupportedEncodingException if UTF-8 is not supported by the system
	 * @throws NoSuchAlgorithmException if SHA-256 is not supported by the system
	 */
	public static String encodeSHA256(String password)
			throws UnsupportedEncodingException, NoSuchAlgorithmException {
		MessageDigest md = MessageDigest.getInstance("SHA-256");
		md.update(password.getBytes("UTF-8"));
        byte[] digest = md.digest();
        return DatatypeConverter.printBase64Binary(digest).toString();
    }

}
Configure Glassfish Security Realm
We need to create and configure a new JDBC Security Realm in Glassfish.
Open Glassfish Admin Console at localhost:4848 . Open Configurations -> server-config -> Security -> Realms and click the “New…” button to create a new security realm.
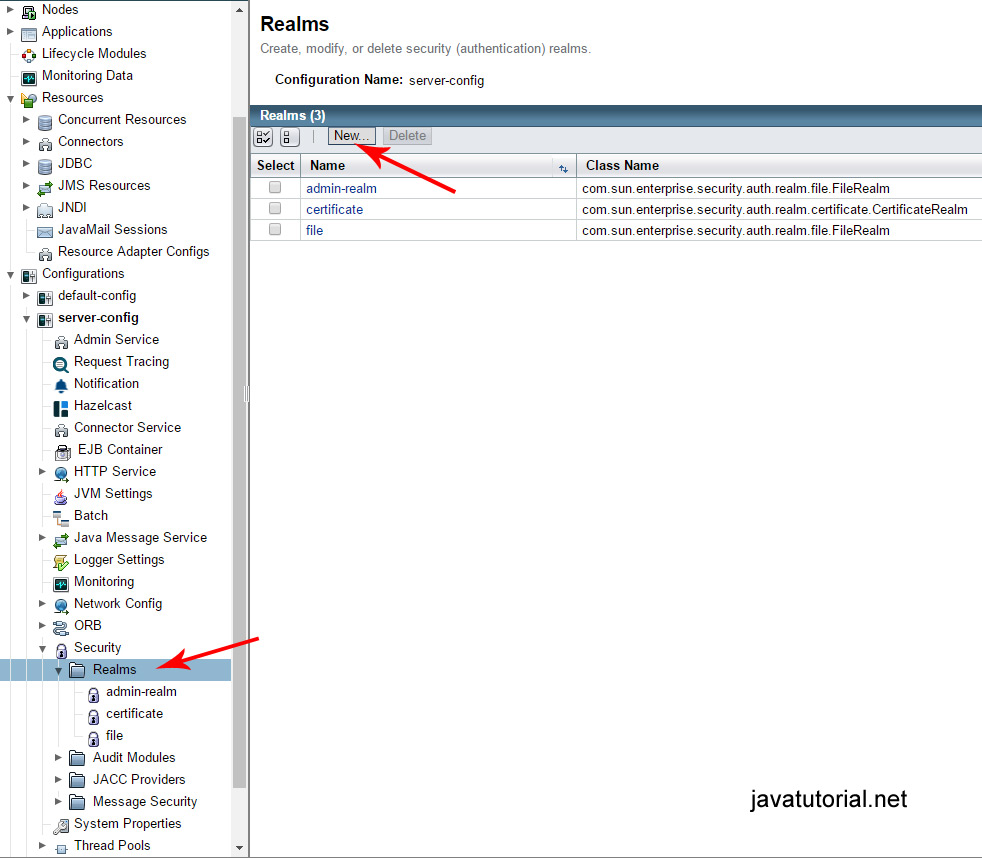
Glassfish server configuration security realms
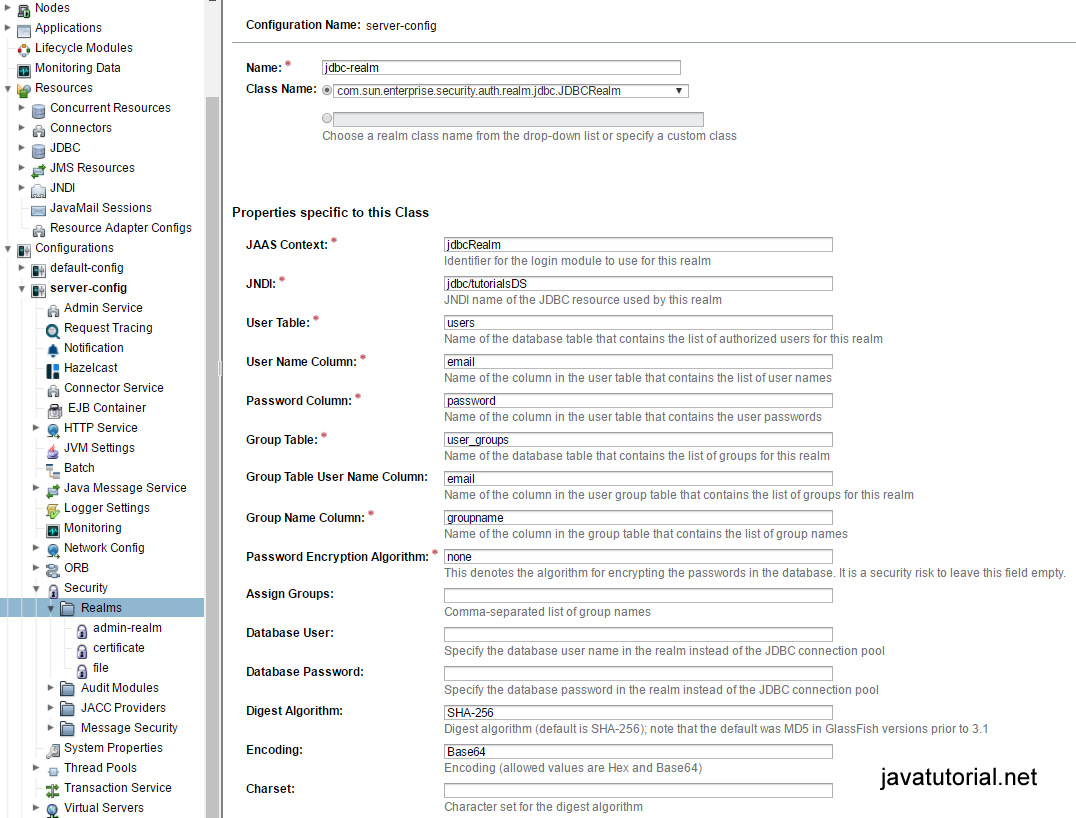
Create new JDBC security realm
Fill out following fields:
- Name – jdbc-realm
- Class Name – com.sun.enterprise.security.auth.realm.jdbc.JDBCRealm
- JAAS Context – jdbcRealm
- JNDI – jdbc/tutorialsDS
- User Table – users
- User Name Column – email
- Password Column – password
- Group Table – user_groups
- Group Table User Name Column – email
- Group Name Column – groupname
- Password Encryption Algorithm – none (we encrypt the password programatically)
- Digest Algorithm – SHA-256
- Encoding – Base64
glassfish-web.xml file
<?xml version="1.0" encoding="UTF-8"?>
<!DOCTYPE glassfish-web-app PUBLIC "-//GlassFish.org//DTD GlassFish Application Server 3.1 Servlet 3.0//EN" "http://glassfish.org/dtds/glassfish-web-app_3_0-1.dtd">
<glassfish-web-app error-url="">
	<security-role-mapping>
		<role-name>users</role-name>
		<group-name>users</group-name>
	</security-role-mapping>
	<class-loader delegate="true" />
	<jsp-config>
		<property name="keepgenerated" value="true">
			<description>Keep a copy of the generated servlet class' java code.</description>
		</property>
	</jsp-config>
	<parameter-encoding default-charset="UTF-8" />
</glassfish-web-app>
We have to specify a security-role-mapping in the glassfish-web.xml file adding the role-name and group-name
The web.xml file
<?xml version="1.0" encoding="UTF-8"?>
<web-app xmlns="http://xmlns.jcp.org/xml/ns/javaee"
	xmlns:xsi="http://www.w3.org/2001/XMLSchema-instance"
	xsi:schemaLocation="http://xmlns.jcp.org/xml/ns/javaee http://xmlns.jcp.org/xml/ns/javaee/web-app_3_1.xsd"
	version="3.1">

    <display-name>Form Based Auth Example</display-name>

    <context-param>
        <param-name>javax.faces.PROJECT_STAGE</param-name>
        <param-value>Development</param-value>
    </context-param>
    <context-param>
        <param-name>javax.faces.DEFAULT_SUFFIX</param-name>
        <param-value>.xhtml</param-value>
    </context-param>
    <servlet>
        <servlet-name>Faces Servlet</servlet-name>
        <servlet-class>javax.faces.webapp.FacesServlet</servlet-class>
        <load-on-startup>1</load-on-startup>
    </servlet>

    <servlet-mapping>
        <servlet-name>Faces Servlet</servlet-name>
        <url-pattern>*.xhtml</url-pattern>
    </servlet-mapping>

    <session-config>
        <session-timeout>
            300
        </session-timeout>
    </session-config>

    <welcome-file-list>
        <welcome-file>signin.xhtml</welcome-file>
    </welcome-file-list>

    <!-- SECURITY -->
    <login-config>
	<auth-method>FORM</auth-method>
        <realm-name>jdbc-realm</realm-name>
	<form-login-config>
		<form-login-page>/signin.xhtml</form-login-page>
		<form-error-page>/signin.xhtml</form-error-page>
	</form-login-config>
    </login-config>

    <security-role>
        <description/>
        <role-name>users</role-name>
    </security-role>

    <security-constraint>
        <display-name>Restricted to users</display-name>
        <web-resource-collection>
            <web-resource-name>Restricted Access</web-resource-name>
            <url-pattern>/user/*</url-pattern>
        </web-resource-collection>
        <auth-constraint>
            <role-name>users</role-name>
        </auth-constraint>
        <user-data-constraint>
		<transport-guarantee>NONE</transport-guarantee>
	</user-data-constraint>
    </security-constraint>
</web-app>
The web.xml deployment descriptor also needs some changes. We are going to configure the security rules here.
First we configure session timeout. This is the time the user session is kept alive. When the session times out the user hast to login again. The value is in minutes. 300 means the user session will be active for 5 hours.
Second, we set the welcome-file to be signin.xhtml. When the user opens the app the login screen will be displayed.
In <login-config> we set following:
-
auth-methodis FORM – the user uses a web form to enter username and password -
realm-nameis jdbc-realm – this is the name of the security realm we configured in previous step -
form-login-pageandform-error-pageare the xhtml file with the login form and the xhtml file shown in case of login error (we point both to signin.xhtml, because error handling is done within this file)
We have only one security role – users
In <security-constraints> tag we define restricted resources for specific user roles. In other words – every file in the user directory requires login to be accessed. We are going to place the private XHTML files there.
Creating the Presentation Layer
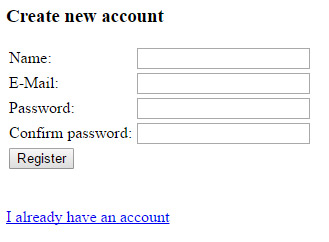
Registration form
Registration Form Page
In the registration form we ask for the name of the user, e-mail address and password. We also require the user to confirm the password. We are going to validate the user input in the email, password and confirm password fields.
Lets first take a look at the JSF XHTML file and the Managed Bean
<!DOCTYPE html PUBLIC "-//W3C//DTD XHTML 1.0 Transitional//EN" "http://www.w3.org/TR/xhtml1/DTD/xhtml1-transitional.dtd">
<html xmlns="http://www.w3.org/1999/xhtml"
	xmlns:h="http://java.sun.com/jsf/html"
	xmlns:f="http://java.sun.com/jsf/core">
<h:head>
	<title>register</title>
</h:head>
<h:body>

	<h:form>

		<!-- register a PostValidateEvent -->
		<f:event listener="#{registerView.validatePassword}"
			type="postValidate" />

		<h3>Create new account</h3>
		<h:panelGrid columns="2">
			<h:outputLabel for="name">Name:</h:outputLabel>
			<h:inputText id="name" value="#{registerView.name}" required="true"
				requiredMessage="Please enter your name" maxlength="30"></h:inputText>

			<h:outputLabel for="email">E-Mail:</h:outputLabel>
			<h:inputText id="email" value="#{registerView.email}" required="true"
				requiredMessage="Please enter your e-mail address">
				<f:validator validatorId="emailValidator" />
			</h:inputText>

			<h:outputLabel for="password">Password:</h:outputLabel>
			<h:inputSecret id="password" value="#{registerView.password}"
				required="true" requiredMessage="Please enter password"
				validatorMessage="Password must contain atleast one lowercase character,
					uppercase character, a digit and it's length must be between 6 and 20 characters">
				<f:validateRegex pattern="((?=.*\d)(?=.*[a-z])(?=.*[A-Z]).{6,20})" />
			</h:inputSecret>

			<h:outputLabel for="confirmpassword">Confirm password:</h:outputLabel>
			<h:inputSecret id="confirmpassword"
				value="#{registerView.confirmPassword}" required="true"
				requiredMessage="Please confirm your password"></h:inputSecret>

			<h:commandButton action="#{registerView.register}" value="Register"></h:commandButton>

		</h:panelGrid>

	</h:form>

	<br />
	<br />
	<h:link value="I already have an account" outcome="signin" />

</h:body>
</html>
RegisterView
package net.javatutorial.tutorials.gfauthexample.managedbeans;

import java.io.Serializable;
import java.util.logging.Logger;

import javax.faces.application.FacesMessage;
import javax.faces.bean.ManagedBean;
import javax.faces.bean.SessionScoped;
import javax.faces.component.UIComponent;
import javax.faces.component.UIInput;
import javax.faces.context.FacesContext;
import javax.faces.event.ComponentSystemEvent;
import javax.inject.Inject;

import net.javatutorial.tutorials.gfauthexample.ejb.UserEJB;
import net.javatutorial.tutorials.gfauthexample.entity.User;

@ManagedBean
@SessionScoped
public class RegisterView implements Serializable {

	private static final long serialVersionUID = 1685823449195612778L;

	private static Logger log = Logger.getLogger(RegisterView.class.getName());

	@Inject
	private UserEJB userEJB;

	private String name;
	private String email;
	private String password;
	private String confirmPassword;

	public void validatePassword(ComponentSystemEvent event) {

		FacesContext facesContext = FacesContext.getCurrentInstance();

		UIComponent components = event.getComponent();

		// get password
		UIInput uiInputPassword = (UIInput) components.findComponent("password");
		String password = uiInputPassword.getLocalValue() == null ? "" : uiInputPassword.getLocalValue().toString();
		String passwordId = uiInputPassword.getClientId();

		// get confirm password
		UIInput uiInputConfirmPassword = (UIInput) components.findComponent("confirmpassword");
		String confirmPassword = uiInputConfirmPassword.getLocalValue() == null ? ""
				: uiInputConfirmPassword.getLocalValue().toString();

		// Let required="true" do its job.
		if (password.isEmpty() || confirmPassword.isEmpty()) {
			return;
		}

		if (!password.equals(confirmPassword)) {
			FacesMessage msg = new FacesMessage("Confirm password does not match password");
			msg.setSeverity(FacesMessage.SEVERITY_ERROR);
			facesContext.addMessage(passwordId, msg);
			facesContext.renderResponse();
		}

		if (userEJB.findUserById(email) != null) {
			FacesMessage msg = new FacesMessage("User with this e-mail already exists");
			msg.setSeverity(FacesMessage.SEVERITY_ERROR);
			facesContext.addMessage(passwordId, msg);
			facesContext.renderResponse();
		}

	}

	public String register() {
		User user = new User(email, password, name);
		userEJB.createUser(user);
		log.info("New user created with e-mail: " + email + " and name: " + name);
		return "regdone";
	}

	public String getName() {
		return name;
	}

	public void setName(String name) {
		this.name = name;
	}

	public String getEmail() {
		return email;
	}

	public void setEmail(String email) {
		this.email = email;
	}

	public String getPassword() {
		return password;
	}

	public void setPassword(String password) {
		this.password = password;
	}

	public String getConfirmPassword() {
		return confirmPassword;
	}

	public void setConfirmPassword(String confirmPassword) {
		this.confirmPassword = confirmPassword;
	}
}
User Input Validation
Validation Rules:
- All fields are mandatory (no empty fields allowed)
- Valid E-Mail address
- Password must contain at least 1 lowercase char, 1 uppercase char, 1 digit
- Password length must be between 6 and 20 characters
- Confirm password must be equal to password
- User e-mail should be unique (not used for another registration)
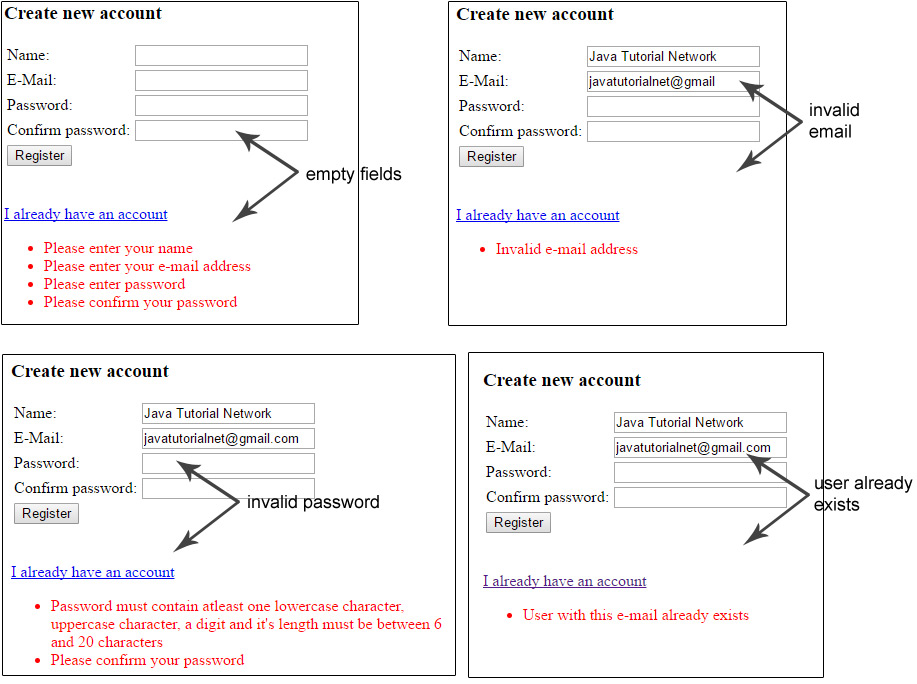
User input form validation
There are 3 possible approaches to validate fields in JSF 2. I am going to demonstrate all 3.
Using JSF validateRegex
We validate the password field with this method. All we have to do is insert a f:validateRegex tag with given regular expression pattern. If you want to know more about regular expressions read the Basic Java Regular Expressions tutorial
<f:validateRegex pattern="((?=.*\d)(?=.*[a-z])(?=.*[A-Z]).{6,20})" />
We also specify the error message inside the JSF file within the validatorMessage attribute
Validating in system event (PostValidateEvent)
The confirm password field is validated with a system event called PostValidateEvent.
We register a new event within the XHTML file:
<f:event listener="#{registerView.validatePassword}" type="postValidate" />
The method public void validatePassword(ComponentSystemEvent event) in RegisterView bean is triggered when the user clicks the “Register” button
Using a custom Validator class
For e-mail validation we use a custom class, which implements javax.faces.validator.Validator interface
The Validator class must implement a single method called validate
public void validate(FacesContext context, UIComponent component, Object value) throws ValidatorException
in this method we verify the user input against a regular expression pattern, and if the pattern does not mach we throw a ValidatorException
package net.javatutorial.tutorials.gfauthexample.validators;

import java.util.regex.Matcher;
import java.util.regex.Pattern;

import javax.faces.application.FacesMessage;
import javax.faces.component.UIComponent;
import javax.faces.context.FacesContext;
import javax.faces.validator.FacesValidator;
import javax.faces.validator.Validator;
import javax.faces.validator.ValidatorException;

@FacesValidator("emailValidator")
public class EmailValidator implements Validator {

	private static final String EMAIL_PATTERN = "^[_A-Za-z0-9-]+(\\."
			+ "[_A-Za-z0-9-]+)*@[A-Za-z0-9]+(\\.[A-Za-z0-9]+)*" + "(\\.[A-Za-z]{2,})$";

	private Pattern pattern;
	private Matcher matcher;

	public EmailValidator() {
		pattern = Pattern.compile(EMAIL_PATTERN);
	}

	@Override
	public void validate(FacesContext context, UIComponent component, Object value) throws ValidatorException {
		matcher = pattern.matcher(value.toString());
		if (!matcher.matches()) {
			throw new ValidatorException(new FacesMessage(FacesMessage.SEVERITY_ERROR, "Invalid e-mail address", null));
		}
	}

}
We have to include the custom validator for given field in the XHTML file using following line
<f:validator validatorId="emailValidator" />
Check if email has been used in another registration
We do not need a Validator for this. You can use a simple check like this inside the Managed Bean – RegisterView
if (userEJB.findUserById(email) != null) { // email is already used }
Successful Registration
If the user inputs correct data in the registration form, a new User object is created and inserted in the database.
User user = new User(email, password, name);
userEJB.createUser(user);
Please note, we also create a Group object for that user inside UserEJB#createUser method
Group group = new Group();
group.setEmail(user.getEmail());
group.setGroupname(Group.USERS_GROUP);
em.persist(user);
em.persist(group);
This is how the database entries look like:
entry in users table
entry in user groups table
Finally the user is redirected to regdone.xhtml page
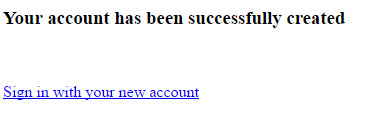
regdone.xhtml page
<!DOCTYPE html PUBLIC "-//W3C//DTD XHTML 1.0 Transitional//EN" "http://www.w3.org/TR/xhtml1/DTD/xhtml1-transitional.dtd">
<html xmlns="http://www.w3.org/1999/xhtml"
		xmlns:h="http://java.sun.com/jsf/html" >
<h:head>
	<title>Registration done</title>
</h:head>
<h:body>
	<h3>Your account has been successfully created</h3>
	<br/><br/>
	<h:link value="Sign in with your new account" outcome="signin" />
</h:body>
</html>
The Login Form
In this form we require user e-mail address and password. The form is validated against empty fields. The username and password validity is checked in the LoginView.
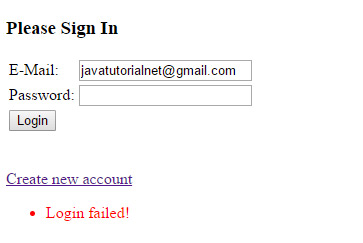
Login form
If the user has entered valid login data a new java.security.Principal object is created. We also add the user to externalContext‘s session map
ExternalContext externalContext = FacesContext.getCurrentInstance().getExternalContext();
Map<String, Object> sessionMap = externalContext.getSessionMap();
sessionMap.put("User", user);
signin.xhtml file
<!DOCTYPE html PUBLIC "-//W3C//DTD XHTML 1.0 Transitional//EN" "http://www.w3.org/TR/xhtml1/DTD/xhtml1-transitional.dtd">
<html xmlns="http://www.w3.org/1999/xhtml"
	xmlns:h="http://java.sun.com/jsf/html">
<h:head>
	<title>login</title>
</h:head>
<h:body>

	<h:form>
		<h3>Please Sign In</h3>
		<h:panelGrid columns="2">
			<h:outputLabel for="email">E-Mail:</h:outputLabel>
			<h:inputText id="email" value="#{loginView.email}" required="true"
				requiredMessage="Please enter your e-mail address"></h:inputText>

			<h:outputLabel for="password">Password:</h:outputLabel>
			<h:inputSecret id="password" value="#{loginView.password}"
				required="true" requiredMessage="Please enter password"></h:inputSecret>

			<h:commandButton action="#{loginView.login}" value="Login"></h:commandButton>
		</h:panelGrid>
	</h:form>

	<br />
	<br />
	<h:link value="Create new account" outcome="register" />

</h:body>
</html>
LoginView ManagedBean
package net.javatutorial.tutorials.gfauthexample.managedbeans;

import java.io.Serializable;
import java.security.Principal;
import java.util.Map;
import java.util.logging.Level;
import java.util.logging.Logger;

import javax.faces.application.FacesMessage;
import javax.faces.bean.ManagedBean;
import javax.faces.bean.SessionScoped;
import javax.faces.context.ExternalContext;
import javax.faces.context.FacesContext;
import javax.inject.Inject;
import javax.servlet.ServletException;
import javax.servlet.http.HttpServletRequest;
import javax.servlet.http.HttpSession;

import net.javatutorial.tutorials.gfauthexample.ejb.UserEJB;
import net.javatutorial.tutorials.gfauthexample.entity.User;

@ManagedBean
@SessionScoped
public class LoginView implements Serializable {

	private static final long serialVersionUID = 3254181235309041386L;

	private static Logger log = Logger.getLogger(LoginView.class.getName());

	@Inject
	private UserEJB userEJB;

	private String email;
	private String password;

	private User user;

	public String login() {
		FacesContext context = FacesContext.getCurrentInstance();
		HttpServletRequest request = (HttpServletRequest) context.getExternalContext().getRequest();

		try {
			request.login(email, password);
		} catch (ServletException e) {
			context.addMessage(null, new FacesMessage(FacesMessage.SEVERITY_ERROR, "Login failed!", null));
			return "signin";
		}

		Principal principal = request.getUserPrincipal();

		this.user = userEJB.findUserById(principal.getName());

		log.info("Authentication done for user: " + principal.getName());

		ExternalContext externalContext = FacesContext.getCurrentInstance().getExternalContext();
		Map<String, Object> sessionMap = externalContext.getSessionMap();
		sessionMap.put("User", user);

		if (request.isUserInRole("users")) {
			return "/user/privatepage?faces-redirect=true";
		} else {
			return "signin";
		}
	}

	public String logout() {
		FacesContext context = FacesContext.getCurrentInstance();
		HttpServletRequest request = (HttpServletRequest) context.getExternalContext().getRequest();

		try {
			this.user = null;
			request.logout();
			// clear the session
			((HttpSession) context.getExternalContext().getSession(false)).invalidate();
		} catch (ServletException e) {
			log.log(Level.SEVERE, "Failed to logout user!", e);
		}

		return "/signin?faces-redirect=true";
	}

	public User getAuthenticatedUser() {
		return user;
	}

	public String getEmail() {
		return email;
	}

	public void setEmail(String email) {
		this.email = email;
	}

	public String getPassword() {
		return password;
	}

	public void setPassword(String password) {
		this.password = password;
	}
}
Finally the user is redirected to /user/privatepage.xhtml
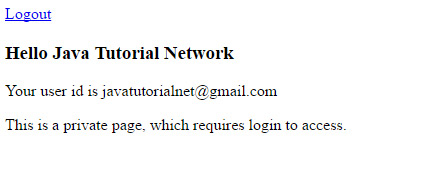
Private page
Logout Function
Logging out is simple. We just have to execute a logout request and invalidate the session
public String logout() {
	FacesContext context = FacesContext.getCurrentInstance();
	HttpServletRequest request = (HttpServletRequest) context.getExternalContext().getRequest();
	try {
		this.user = null;
		request.logout();
		// clear the session
		((HttpSession) context.getExternalContext().getSession(false)).invalidate();
	} catch (ServletException e) {
		log.log(Level.SEVERE, "Failed to logout user!", e);
	}
	return "/signin?faces-redirect=true";
}
Troubleshooting
Troubleshoot security code is very hard. Most of the components don’t throw meaningful exceptions. This is intentionally done this way to prevent hackers to get useful information while trying to crack the security of your apps. Unfortunately we don’t get this useful information either. If you find some issues try to follow the exceptions. Check your Security Realm configuration twice and check if all password encoding is done correct.


Hi…thanks a lot for this tutorial
I’m new to java ee and i really want to implement glassfish form authentication in a non-maven project. But i don’t know what to do with the pom.xml dependencies shown above…
Does anyone have an idea?
Hello Honoré,
yes – it is possible to build the project without Maven, although I will always recommend using a building tool like Maven or Gradle for your projects. Those do the “dirty work” for you and you do not have to handle all the dependencies, download jars, build and package. The tool does all this for you.
To build this particular project you need the javaee-api Jar. There are no additional dependencies. You can download the jar at the Central Maven Repository https://search.maven.org/#search%7Cgav%7C1%7Cg%3A%22javax%22%20AND%20a%3A%22javaee-api%22
Hi filip, thank you for this tutorial, I implemented but I always login faild, and it’s been hours that I galley find the problem som help please
Hello, I am new to JavaEE. Great tutorial. I followed all the steps to integrate it into my project. Everything builds, no errors and glassfish is configured. But in login function, where request.login(email, password) is called ALWAYS failes atm. Just like Martial mentioned.
Philip, is there any possibility something in the tutorial is missing here? Or a common mistake is made?
Thanks in advance
Hi Willem, can you please share what happens when request.login is called? An exception would be great.
Hi Filip.
It’s not working:
NULL_CAUSE_MESSAGE: Cannot suppress a null exception.
SELF_SUPPRESSION_MESSAGE: Self-suppression not permitted
The error happens in request.login(email, password);
You cannot use SQL reserved word “group” or “groups” as table names in SQL databases
I am having the same problem as Gustavo. Any idea as to what is wrong?
Good tutorial, but misses 1 little thing that prevents the whole to work:
Don’t forget to add “users” to the field of “ASSIGN GROUPS” in your jdbc-realm of glassfish.