In previous tutorials you have learned about Android intent, services and activities. This and coming few tutorials explain about different layouts in Android.
Layout is the way in which things are arranged in a specific manner. Android also provides different layouts to arrange different components in different manner. Some of them are linear layout, relative layout, web view layout etc. Layouts are very important for the development of UI applications. The main focus of this tutorial is linear layout.
Linear layout
Linear layout in Android allow us to arrange components horizontally in a single column or vertically in a single row. Vertically or horizontally direction depends on attribute android: orientation. Linear layout is simple and easy to use, it creates a scroll bar if the length of the window exceeds the length of the screen. Vertically linear layout has only one item per row. Linear layout has many different attributes which can be used to customize linear layout according to needs. Following figure shows horizontal and vertical linear layout.
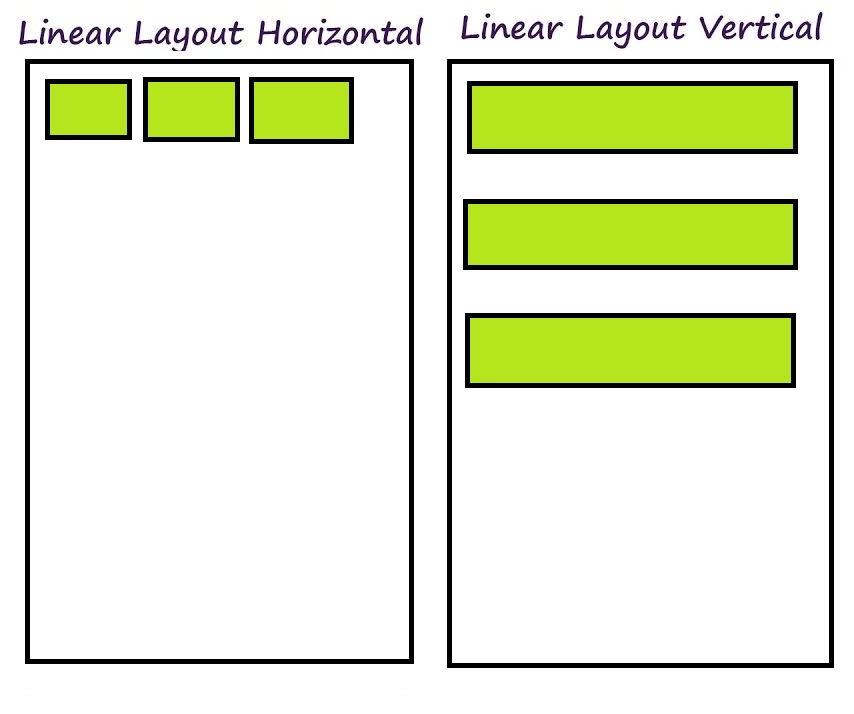
Linear layout
Attributes of linear layout
Following are some attributes of linear layout of Android.
- Id: Unique identifier of layout.
- Orientation: Attribute to set linear layout orientation as vertical or horizontal.
- Layout_Weight: This attribute assigns “importance” value at each component.
- Gravity: This attribute shows object position in x-y plan such as center, right, top, bottom and left.
- Weight_sum: This attribute defines the maximum weighted sum.
- Divider: draw able to use as a vertical divider between buttons.
Other than these attributes, linear layout has many different constructors.
Constructors of linear layout
Following are constructors of linear layout
- LinearLayout(Context context)
- LinearLayout(Context context, AttributeSet attrs)
- LinearLayout(Context context, AttributeSet attrs, int styleAttribute)
- LinearLayout(Context context, AttributeSet attrs, int styleAttribute, int styleRes)
Example of linear layout in Android
Linear layout looks different if the attributes values are set different for two linear layouts, such as vertical linear layout or horizontal linear layout.
Following example shows vertical linear layout. Here is the activity_linear_vertical.xml
<?xml version="1.0" encoding="utf-8"?>
<LinearLayout android:layout_width="368dp"
    android:layout_height="495dp"
    xmlns:tools="http://schemas.android.com/tools"
    android:orientation="vertical"
    tools:layout_editor_absoluteX="8dp"
    tools:layout_editor_absoluteY="8dp"
    xmlns:android="http://schemas.android.com/apk/res/android">

        <Button
            android:id="@+id/button5"
            android:layout_width="match_parent"
            android:layout_height="wrap_content"
            android:text="Button1" />

        <Button
            android:id="@+id/button6"
            android:layout_width="match_parent"
            android:layout_height="wrap_content"
            android:text="Button2" />

        <Button
            android:id="@+id/button7"
            android:layout_width="match_parent"
            android:layout_height="wrap_content"
            android:text="Button3" />

        <Button
            android:id="@+id/button8"
            android:layout_width="match_parent"
            android:layout_height="wrap_content"
            android:text="Button4" />
    </LinearLayout>
Here is the output how it looks
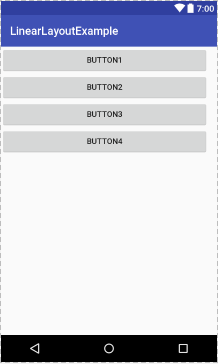
linear layout Vertical
Here is another example which shows horizontal linear layout. Below is the code for activity_linear_horizontal.xml
<?xml version="1.0" encoding="utf-8"?>

<LinearLayout android:layout_width="368dp"
    android:layout_height="495dp"
    xmlns:tools="http://schemas.android.com/tools"
    android:orientation="horizontal"
    tools:layout_editor_absoluteX="8dp"
    tools:layout_editor_absoluteY="8dp"
    xmlns:android="http://schemas.android.com/apk/res/android">

        <Button
            android:id="@+id/button4"
            android:layout_width="wrap_content"
            android:layout_height="wrap_content"
            android:layout_weight="1"
            android:text="Button4" />

        <Button
            android:id="@+id/button3"
            android:layout_width="wrap_content"
            android:layout_height="wrap_content"
            android:layout_weight="1"
            android:text="Button3" />

        <Button
            android:id="@+id/button2"
            android:layout_width="wrap_content"
            android:layout_height="wrap_content"
            android:layout_weight="1"
            android:text="Button2" />

        <Button
            android:id="@+id/button"
            android:layout_width="wrap_content"
            android:layout_height="wrap_content"
            android:layout_weight="1"
            android:text="Button1" />
    </LinearLayout>
Here is the output how it looks
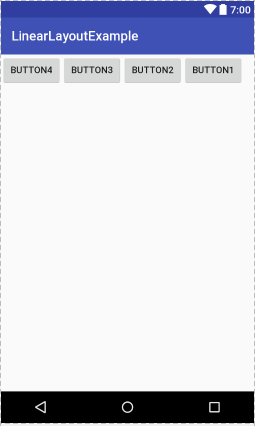
linear Layout Horizontal
You can download the example code from this link. For more Android layouts follow the next tutorials.