In this tutorial I will show you how to control the speed of a DC motor with your Raspberry Pi.
If you are looking for a tutorial on how to control both – the speed and direction of a motor, check my newest tutorial on that topic Raspberry Pi Control DC Motor Speed and Direction with Java
Controlling a motor is one of the most exciting things you can do with your Raspberry Pi. Motors are power-hungry components. They often require more power than the 3V3 your Raspberry can provide. That’s the reason we will connect the motor to a external power source (battery). You can use the same techniques described in this tutorial to work with any component, which requires external power source.
Building the Circuit
Before we can do anything we have to hook it all together. For this tutorial you will need
- a DC motor
- external power supply (battery) – you may need a different voltage according to your motor
- Darlington Array chip (ULN2003) – I will give you more details on this later in this tutorial
- a couple of wires
Look at the diagram below. It shows how to build the circuit.
And this is the schematic of our circuit
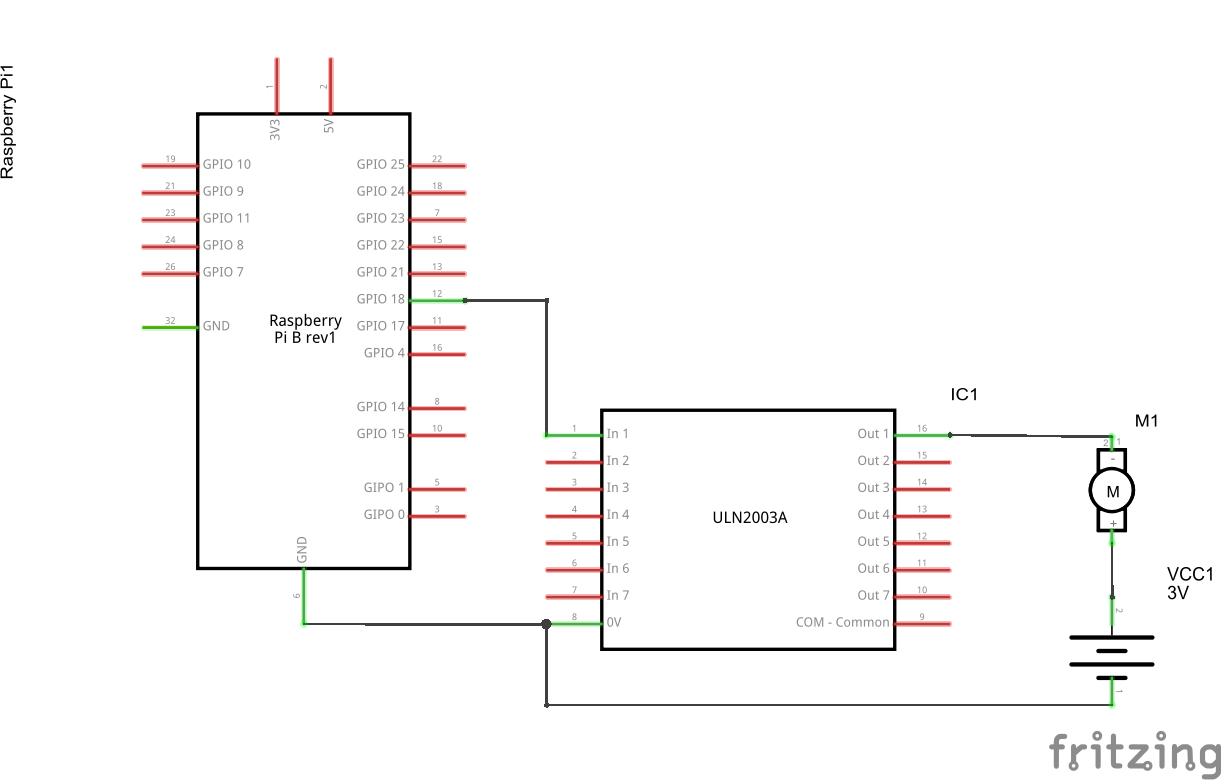
Darlington Array Chip
The ULN2003 is seven pairs of transistors that allows us to switch a higher voltage with the 3V3 from a GPIO port in a safe way. We can use a standard transistor instead, but why should we bother when the ULN2003 can be ordered for less than 0.20$ and can control 7 motors at the same time.
Another important thing about ULN2003 is, that it protects your Raspberry GPIO ports from the voltage spike that can occur when an inductive load (a relay, solenoid, motor etc.) is switched off.
Controlling the Motor
We will use a software PWM to control the motor speed. If you want to know more about PWM please read my previous tutorial Raspberry Pi Dim LED with PWM and Java. We will use the Pi4j API to write our speed controlling program in Java. If you want to know how to install, configure and run projects with Pi4j please refer to this tutorial.
In Pi4j PWM values go from 0 to 100. In the following example program we will get use of this and first rotate the motor at 25% speed, than go to half speed (50%), than to full speed(100%) and finally turn it down.
import com.pi4j.wiringpi.Gpio;
import com.pi4j.wiringpi.SoftPwm;

public class MotorPWM {

	private static int PIN_NUMBER = 1;

	public static void main(String[] args) throws InterruptedException {

		System.out.println("Started");

		// initialize wiringPi library, this is needed for PWM
		Gpio.wiringPiSetup();

		// softPwmCreate(int pin, int value, int range)
		// the range is set like (min=0 ; max=100)
		SoftPwm.softPwmCreate(PIN_NUMBER, 0, 100);

		setSpeed(25);
		setSpeed(50);
		setSpeed(100);
		setSpeed(0);

		System.out.println("Finished");
	}

	private static void setSpeed(int speed) throws InterruptedException {
		System.out.println("Speed is set to " + speed + "%");
		// softPwmWrite(int pin, int value)
		// This updates the PWM value on the given pin. The value is checked to
		// be in-range and pins that haven't previously been initialized via
		// softPwmCreate will be silently ignored.
		SoftPwm.softPwmWrite(PIN_NUMBER, speed);
		// wait 3 seconds
		Thread.sleep(3000);
	}
}
You can run the program on Raspberry with following command:
sudo java -classpath .:classes:/opt/pi4j/lib/'*' MotorPWM
Watch the video to see the final result
View Comments (7)
Hi
Is there a way to change the direction?
Hi, not with the ULN2003 chip. You will need an H bridge for a simple DC motor to change direction. I will create a separate tutorial on this topic
Plz sir make the tutorial as soon as it is possible.
Also make a separate tutorial on how to rin and start first java program on raspberry pi 3 model B
Hi, the new tutorial is ready, now you can control both - the speed and the direction of DC motors. Check it out: https://javatutorial.net/raspberry-pi-control-dc-motor-speed-and-direction-java
Thanks for a very good article; I used the information to implement this in C/C++. One question: how do the pin numbers (1, in this case) map to the GPIO pin numbers on the Raspberry Pi (18, in this case)?
Hi,
there are two different ways to refer to GPIO pins: GPIO numbering and physical numbering.
The GPIO numbering is how the Pi labels the pins. The numbers don't make much sense to humans, because they jump about all over the place.
On the other hand the physical numbering refers to the pins by simply counting across and down from pin 1 at the top left.
This tutorials are based on the Java Raspberry Pi library/wrapper called Pi4j, which in terms has its own pin numbering / mapping. In "Raspberry Pi Java Tutorial" I have shown the numbering used by Pi4j https://javatutorial.net/wp-content/uploads/2015/01/pi4j-pin-numbers.jpg
If you use other programming languages for completing this tutorial like Python, C, C++ etc. you may want to read the documentation on how the corresponding GPIO library for this language maps the pins.
In other words GPIO pin 18 is referred as 18 in python, it is pin #1 in Pi4j and may also be found as physical pin 12 in tutorials or diagrams, so always check the documentation of the library you use for your implementation ;)
Very good. Thanks for the quick reply.