This tutorial will help you understand how to perform basic database operations such as Create, Retrieve, Update and Delete (CRUD) using JDBC, which stands for Java Database Connectivity API. If you have used SQL before, you would be familiar with the INSERT, SELECT, UPDATE and DELETE statements. Effectively, CRUD and ISUD are the same.

Before we begin with the actual fun stuff, make sure you have JDK installed (click here if you don’t have it), MySQL (click here to download and/or you can download the MySQL Workbench) and a JDBC Driver for MYSQL (click here to download) and when you download the driver, make sure you extract the zip archive and after that put the .jar file (there will be only one) into the same folder as your Java source files.
First, let’s create our model
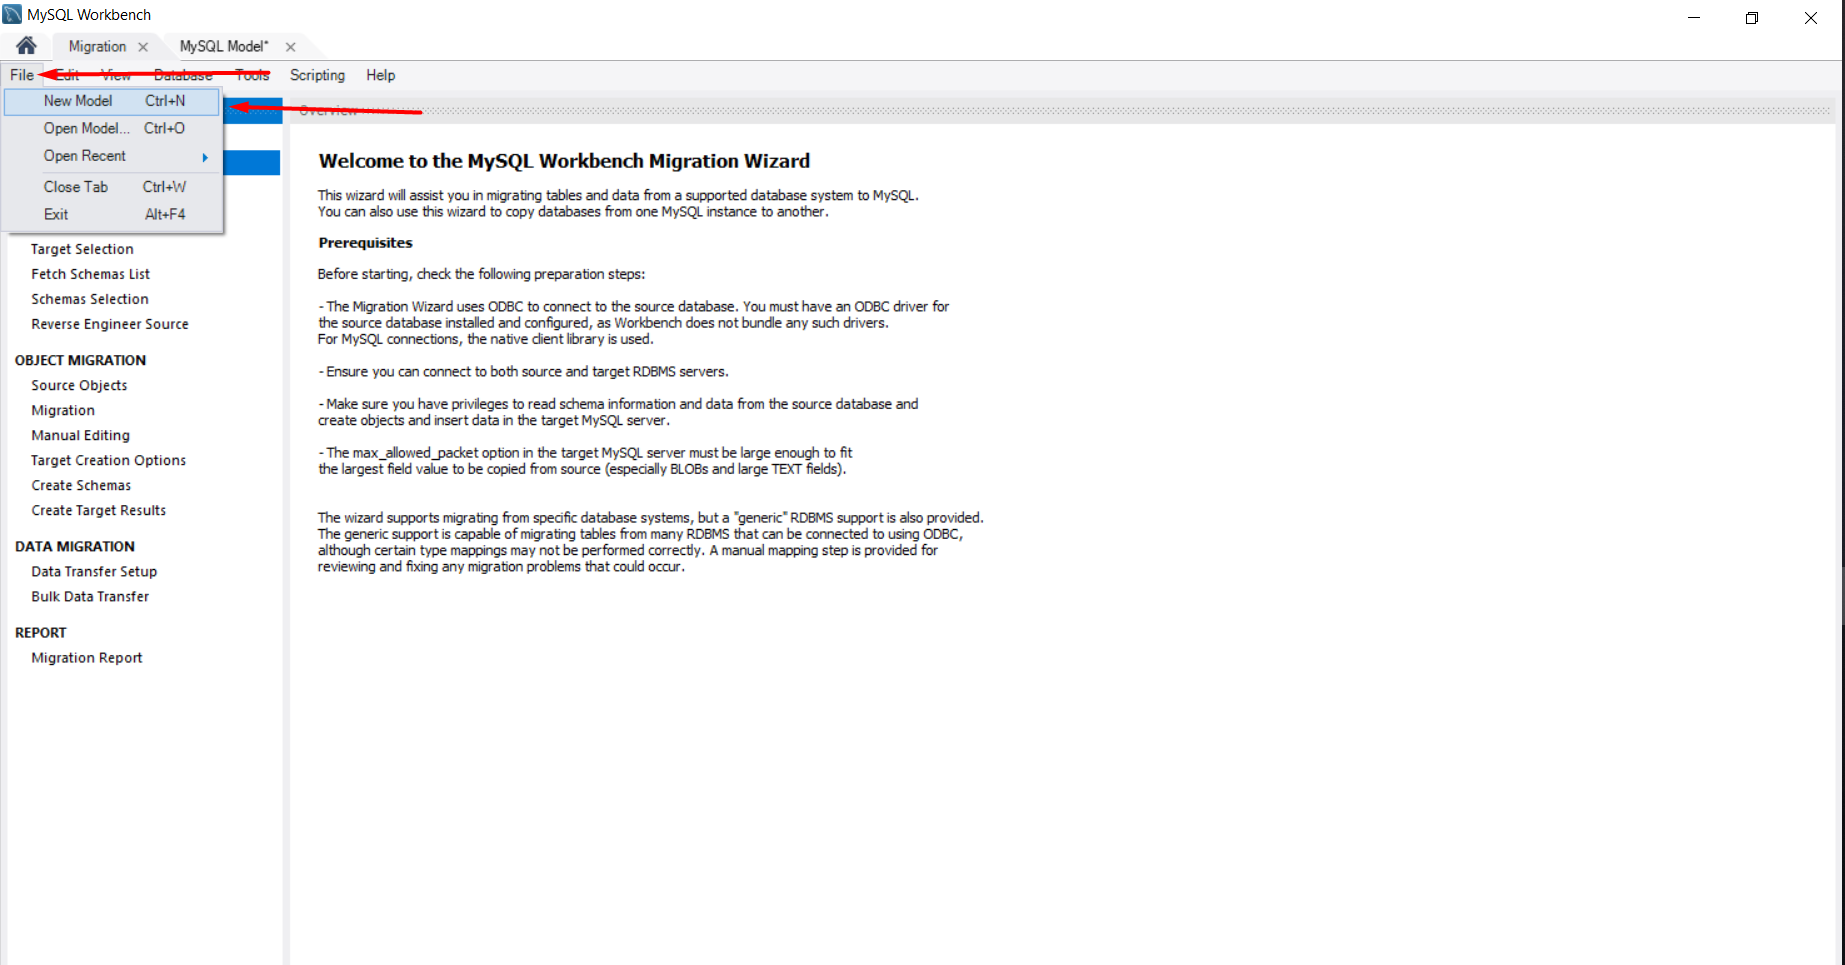
In your MySQL workbench, click on File and select New File or simply press Ctrl+N.
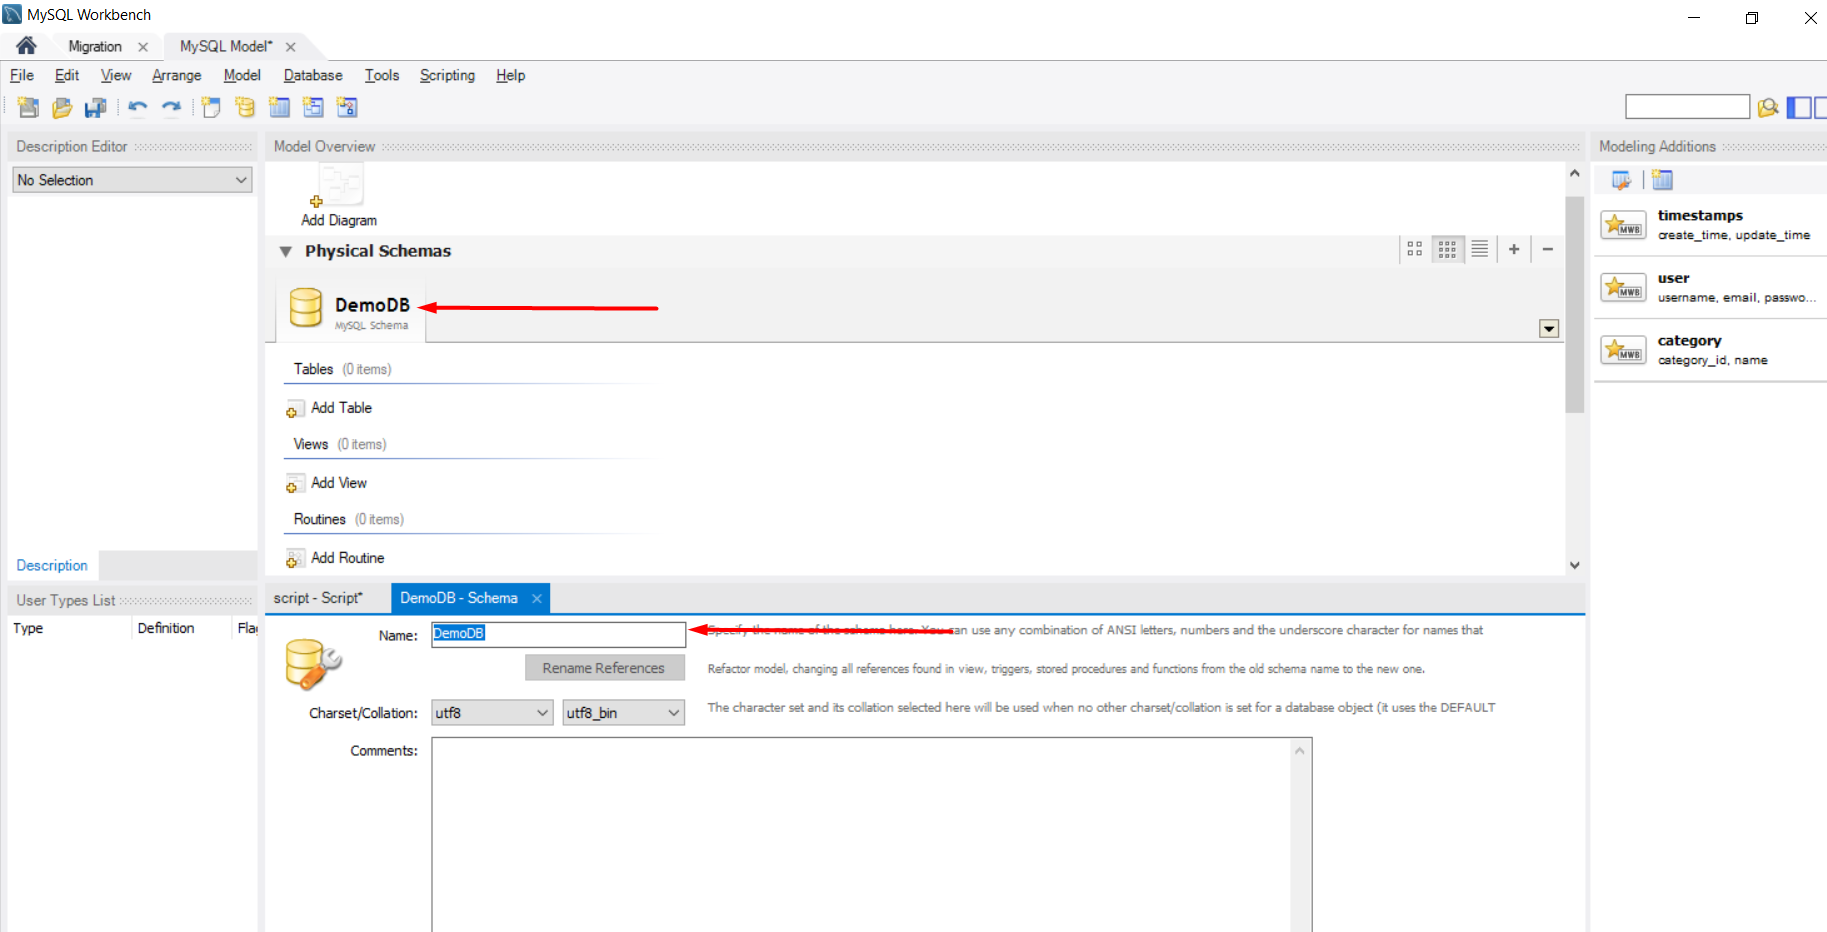
After that, let’s create our database and let’s call it DemoDB. To rename the DB simply double click on the icon below “Physical Schemas”.
Now, it’s time for us to create our first table. Let’s call it Employees for this example. To create the table, we need to use our DemoDB. View the SQL script below:
create database DemoDB;

use DemoDB;

CREATE TABLE `employees` (
    `id` int(2) NOT NULL AUTOINCREMENT,
    `name` varchar(45) NOT NULL,
    `secondname` varchar(45) NOT NULL,
    `email` varchar(45) NOT NULL,
    PRIMARY KEY (`id`)
);
To connect to the database, your database server must be listening on the default port 3306 at localhost for the example below to work.
String dbURL = "jdbc:mysql://localhost:3306/demodb";
String name = "John";
String secondName = "Smith";

try
{
    Connection connection = DriverManager.getConnection(dbURL, name, secondName);

    if (connection != null)
        System.out.println("Connection successful!");

}
catch (SQLException e)
{
    e.printStackTrace();
}
A brief breakdown of the Java code snippet above
Connection is an interface that represents database connection session from which we are able to create statements that will execute query/queries and as a consequence, retrieve results, close connection and so on.
DriverManager is a class which is used to register a driver for a specific database type (e.g. MySQL) and establishes a database connection with the server using the getConnection() method.
After you have finished working with the database you are using, make sure you close it! There are two options. 1.:
connection.close();
and 2:
try
   (Connection connection = DriverManager.getConnection(dbURL, name, secondName))
{


}
catch (SQLException e) {
    e.printStackTrace();
}
In the second case, there is no need to call the close() method as it closes the connection automatically (Java 7 and above!).
Okay, after we have learned how to create the database, how to connect to it and how to close it, it is time for some action.
Inserting a row
import java.sql.Connection;
import java.sql.DriverManager;
import java.sql.SQLException;
import java.sql.Statement;

public class InsertRow {
    public static void main(String[] args) {
            String dbURL = "jdbc:mysql://localhost:3306/demodb";
            String name = "John";
            String secondname = "Smith";
            try (Connection connection = DriverManager.getConnection(dbURL, name, secondName){

            Statement queryStatement = connection.createStatement());

            String record = "INSERT INTO employees (ID, FIRSTNAME, SECONDNAME, EMAIL) "
            + "VALUES (1,'Bob','Smith','b0bsmith@example.com')";

            queryStatement.executeUpdate(record1);

            System.out.println("Insertion completed");

        }
        catch (Exception e) {
            e.printStackTrace();
        }

    }
}
That’s one possible approach on how to insert a row into a database.
Now let’s update a row
import java.sql.Connection;
import java.sql.DriverManager;
import java.sql.SQLException;
import java.sql.Statement;

public class UpdateRow {

    public static void main(String[] args) {
        String dbURL = "jdbc:mysql://localhost:3306/demodb";
        String name = "John";
        String secondName = "Smith";

        try (Connection connection = DriverManager.getConnection(dbURL, name, secondName);
             Statement queryStatement = connection.createStatement()) {

            String sqlUpdateQuery = "UPDATE employee SET name="Bobby" where id=1";
            queryStatement.executeUpdate(sqlUpdateQuery);

        }
        catch (Exception e) {
            e.printStackTrace();
        }

    }
}
So in this example, we update the employee that had id set to 1 name to Bobby.
Batch update
import java.sql.Connection;
import java.sql.DriverManager;
import java.sql.SQLException;
import java.sql.Statement;
import java.util.Arrays;

public class BatchUpdate {

    public static void main(String[] args) {
        String dbURL = "jdbc:mysql://localhost:3306/demodb";
        String name = "John";
        String secondName= "Smith";

        try (Connection connection = DriverManager.getConnection(dbURL, name, secondName);
             Statement statement = conn.createStatement()) {


            // add list of SQL commands and run as a batch
            connection.setAutoCommit(false);
            statement.addBatch(SQL_DROP);
            statement.addBatch(SQL_CREATE);
            statement.addBatch(Insert("Fish", "Wiliams", "fish.wiliams@example.com"));
            statement.addBatch(Update(1, "Sam"));


            //Explicitly commit statements to apply changes
            connection.commit();

        }
        catch (Exception e) {
            e.printStackTrace();
        }

    }

    String SQL_CREATE = "CREATE TABLE employees("
            + " id INT NOT NULL AUTOINCREMENT,"
            + " name varchar(45) NOT NULL,"
            + " secondName varchar(45) NOT NULL,"
            + " email varchar(45) NOT NULL,"
            + " PRIMARY KEY (id)"
            + ")";

    String SQL_DROP = "DROP TABLE IF EXISTS employees";

    private String Insert(String name, String secondname, String email) {

        return "INSERT INTO employees(name, secondName, email) " +
                "VALUES ('" + name + "','" + secondname+ "','" + email + "')";

    }

    private String Update(int id, String name) {

        return "UPDATE employees SET name='" + name + "' WHERE id='" + id + "'";

    }

}
Here, we execute a couple of SQL comamnds – DROP, CREATE, INSERT and UPDATE.
Deleting a row
import java.sql.Connection;
import java.sql.DriverManager;
import java.sql.SQLException;
import java.sql.Statement;

public class DeleteRow {
    public static void main(String[] args) {
        String dbURL = "jdbc:mysql://localhost:3306/demodb";
        String name = "John";
        String secondName = "Smith";
        try (Connection connection = DriverManager.getConnection(dbURL, name, secondName);
             Statement statement = conn.createStatement()) {

            statement.executeUpdate(DeleteName("John"));
            System.out.println("Record deleted successfully.");
        }
        catch (Exception e) {
            e.printStackTrace();
        }

    }

    private String DeleteName(String name) {

        return "DELETE FROM employees WHERE name='" + name + "'";

    }
}