MVC stands for Model-View-Controller and Spring supports it. The great thing about the MVC pattern is that it separates different aspects of the application like inputs, business logic and user interface. This pattern is so widely used that it even has a song about it.

The three components in the MVC pattern are Model, View, Controller, hence the acronym.
Roles
Model
Model in a nutshell, stores the data that the UI presents to the user.
View
View in a nutshell, visualizes the data.
Controller
Controller in a nutshell, manages the behaviour of the state machine, a.k.a. responding to events, execution of commands and updating the model. For example, what happens when the user clicks on a button.
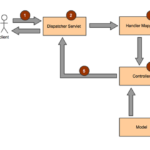
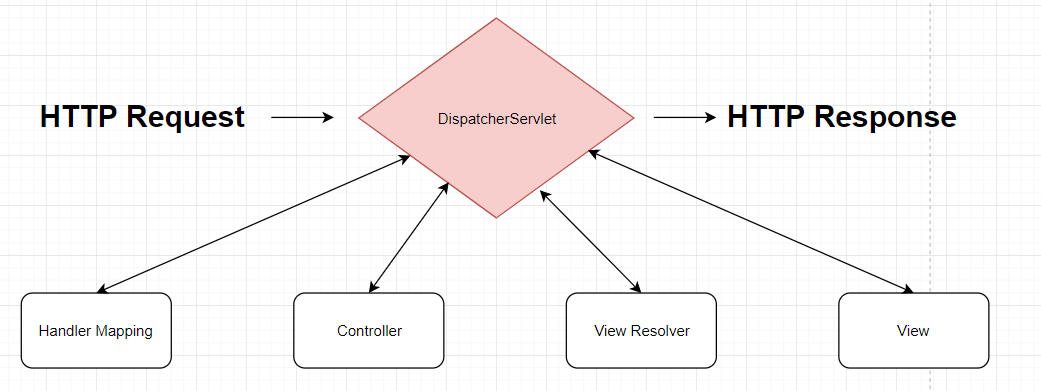
DispatcherServlet
The whole MVC pattern in Spring is designed around DispatcherServlet which handles all the HTTP requests and responses.
Benefits of MVC
- Reusability
- Flexibility
- Powerful
Let’s see how the above are achieved.
Reusability – by using objects that elready exist to form other objects instead of copying them.
Flexibility – can take advantage of the parameter annotations (like @RequestParam, @RequestHeader and so on).
Powerful – the MVC architecture supports asynchronous technique which means that applications that are built using this pattern, load significantly faster.
How to define a Controller?
The @Controller annotation is used to make a class act like a Controller. We can also use @RequestMapping annotation alongside @Controller to specify the URL route of either a class or a method. In our case, we will specify the URL for the entire Controller class.
@Controller
@RequestMapping("/")
public class ControllerDemo {
	@RequestMapping(method = RequestMethod.GET)
	public String helloWorld(ModelMap model) {
		model.addAttribute("message", "Hello World");
		return "helloWorld";
	}
}
Thanks to @RequestMapping(“/”), all the methods that are present in that class will be relative to “/” path. We also specify that our helloWorld method handles GET requests.
Of course, if you want to, you can add more methods that can represent POST for example. I only include GET for the sake of simplicity.
How to create a View?
Above, I mentioned that Flexbility is one of the advantages of this architecture. Well, Spring MVC supports many types of views technologies – HTML, PDF, Excel, XML and so on. So chances are, your technology will be supported. That gives you the flexibility (no pun intended) to choose whatever technology you are most comfortable working with.
In our case, we will be creating our view with HTML.
<html>
	<head>
		<title>Hello World</title>
	</head>

	<body>
		<h1> Message coming from helloWorld() method that resides in ControllerDemo class: ${ message } </h1>
	</body>
</html>
We will store this html file (our view) in /WEB-INF/helloWorld/ and give it the name helloWorld.jsp.
Can you guess what the ${ message } will give us back? It will return whatever message we added as an attribute to the model. Let’s see what’s the case for our example:
model.addAttribute("message", "Hello World");
Therefore, the output of ${ message } would be “Hello World”.