This tutorial explains services in Android, its life cycle and gives example of how to create a service.
Android service is very different concept from Android activity. It is the concept of Android app development. Let’s discuss it.
Android Service
Services are used to implement or to perform background operations running in our app. It is an application component used to perform long running important background tasks such as playing music, downloading a file or performing a network transaction. As services run in background so it don’t have any user interface unlike activities. It allows us to enable multitasking in our application. Services continue running in the background although the application is closed or the service finishes it’s job or is explicitly stopped. So it has higher priority than inactive apps. You can also set it priority same as the running foreground task. Let’s discuss types of services.
Types of Android services
There are three different types of services in Android.
Scheduled: A service is scheduled in an API like jobScheduler then it is called scheduled service. The system checks jobScheduler and execute service at the appropriate time.
Started: If a service can be started by the application component then it is called started service. Activity calls startService() method, then it runs in the background. Normally this service performs single operation.
Bound: If an application component binds a service to bindService() then it is called bound. It has a client server interface which allows component to interact with the service.
Life cycle of Android service
Android service life cycle is completely different from Android activity. Life cycle of an service can be different if it is created with the startService() or created with the bindService(). Following diagram shows both life cycles.
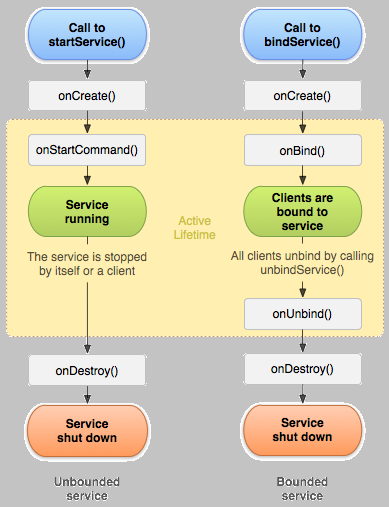
Life cycle of service
Let’s discuss call back methods of service life cycle. OnStartCommand() method is called when startService() is used to create a service. Service stars running in the background after the execution of this method. If you created a service by using this method then stop it by calling stopSelf() or stopService() method. OnBound() method is used if service is bounded. Other components use this method to bind themselves with the service. OnCreate() method is used for the creation of service. OnDestroy() method is used to destroy a service.
Example of service in Android
Here is an example of service in Android Studio. Open your IDE and create a new project. Create activity and name it as actvity_main, here is the code for activty_main.xml
<?xml version="1.0" encoding="utf-8"?>

<RelativeLayout android:layout_width="368dp"
    android:layout_height="495dp"
    xmlns:tools="http://schemas.android.com/tools"
    tools:layout_editor_absoluteX="8dp"
    tools:layout_editor_absoluteY="8dp"
    xmlns:android="http://schemas.android.com/apk/res/android">

        <Button
            android:id="@+id/buttonStart"
            android:layout_width="wrap_content"
            android:layout_height="wrap_content"
            android:layout_alignParentTop="true"
            android:layout_centerHorizontal="true"
            android:layout_marginTop="122dp"
            android:text="Button"
            tools:text="Start Service" />

        <Button
            android:id="@+id/buttonStop"
            android:layout_width="wrap_content"
            android:layout_height="wrap_content"
            android:layout_alignLeft="@+id/buttonStart"
            android:layout_alignStart="@+id/buttonStart"
            android:layout_below="@+id/buttonStart"
            android:layout_marginTop="36dp"
            android:text="Button"
            tools:text="Stop Service" />

        <Button
            android:id="@+id/buttonNext"
            android:layout_width="wrap_content"
            android:layout_height="wrap_content"
            android:layout_marginTop="44dp"
            android:text="Button"
            tools:text="Next"
            android:layout_below="@+id/buttonStop"
            android:layout_centerHorizontal="true" />

    <TextView
        android:id="@+id/textView"
        android:layout_width="wrap_content"
        android:layout_height="wrap_content"
        android:layout_alignParentTop="true"
        android:layout_centerHorizontal="true"
        android:layout_marginTop="47dp"
        android:text="TextView"
        android:textColorLink="@android:color/black"
        android:textSize="24sp"
        tools:text="javaTutorial.net" />
</RelativeLayout>
Here is the code for MainActivity.java
package com.example.admin.androidservice;

import android.app.Activity;
import android.content.Intent;
import android.support.v7.app.AppCompatActivity;
import android.os.Bundle;
import android.view.View;
import android.widget.Button;

public class MainActivity extends Activity implements View.OnClickListener {

    Button buttonStart, buttonStop,buttonNext;
    @Override
    public void onCreate(Bundle savedInstanceState) {
        super.onCreate(savedInstanceState);
        setContentView(R.layout.activity_main);

        buttonStart = (Button) findViewById(R.id.buttonStart);
        buttonStop = (Button) findViewById(R.id.buttonStop);
        buttonNext = (Button) findViewById(R.id.buttonNext);

        buttonStart.setOnClickListener(this);
        buttonStop.setOnClickListener(this);
        buttonNext.setOnClickListener(this);
    }
    public void onClick(View src) {
        switch (src.getId()) {
            case R.id.buttonStart:
                startService(new Intent(this, SecondActivity.class));
                break;
            case R.id.buttonStop:
                stopService(new Intent(this, SecondActivity.class));
                break;
            case R.id.buttonNext:
                Intent intent=new Intent(this,SecondActivity.class);
                startActivity(intent);
                break;
        }
    }
}
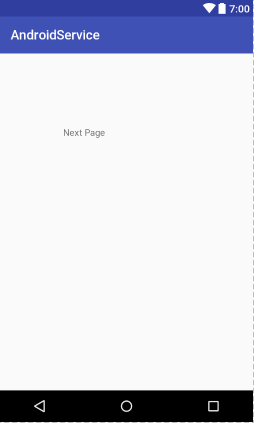
Create another activity for another screen and name it second. Open activity_second.xml and paste the following code
<?xml version="1.0" encoding="utf-8"?>

<RelativeLayout android:layout_width="368dp"
    android:layout_height="495dp"
    xmlns:tools="http://schemas.android.com/tools"
    tools:layout_editor_absoluteX="8dp"
    tools:layout_editor_absoluteY="8dp"
    xmlns:android="http://schemas.android.com/apk/res/android">

    <TextView
        android:id="@+id/textView1"
        android:layout_width="wrap_content"
        android:layout_height="wrap_content"
        android:layout_alignParentLeft="true"
        android:layout_alignParentTop="true"
        android:layout_marginLeft="96dp"
        android:layout_marginTop="112dp"
        android:text="Next Page" />

</RelativeLayout>
Here is code for secondActivity.java
package com.example.admin.androidservice;

import android.support.v7.app.AppCompatActivity;
import android.os.Bundle;

public class SecondActivity extends AppCompatActivity {


        @Override
        public void onCreate(Bundle savedInstanceState) {
            super.onCreate(savedInstanceState);
            setContentView(R.layout.activity_second);
        }

}
Run and test it, here is the output of this code
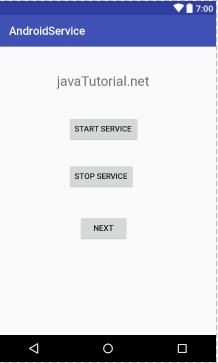
android service
service
You can download code from this link.


Hi,
I think android manifest is missing. How to declare the second activity?
Thanks for the post.